Overview: Can the deleted and lost photos, pictures being restored on Samsung Galaxy Note 8, as well as Samsung Galaxy Note 9? The answer is definitely yes. This article will intorduct 3 simple and effective ways to solve this problem.
If the Photos has been deleted by mistake, can we still have some ways to restore them? Let’s see what I experienced: Today I cleaned up some files on my Samsung Galaxy Note 8 so as to free up more space, and I think it's better to clean up the unused content and information on the phone at regular intervals. Normally, I would first check whether these files or data are important, after all, I'm afraid to delete those important data. However, today I didn't check it carefully. When I came back, I found that some precious photos was deleted. If I have encountered this situation in the past, I may have lost my picture forever. However, when I mastered some useful methods, I was no longer worried.
In fact, both the Samsung Galaxy Note 8 and Samsung Galaxy Note 9 all have a very powerful shooting configuration that provides users with a great shooting experience. However, with the increasing number of pictures, the possibility of data loss is even greater. Don't worry, if you accidentally lose some important pictures or photos, the next three methods should help you.
Method 1 Directly Recover Photos Pictures from Samsung Galaxy Note 8/Note 9 without Backup
Samsung Data Recovery can help users recover and retrieve deleted or lost data, including text messages, contacts, call history, photos, videos, audio, WhatsApp messages, etc., which lost due to deleting, restoring factory settings, flashing ROM, rooting, and so on. No matter how bad the situation is, it can basically solve the problem. In addition, it can be applied to more than 6 thousand Android devices, in addition to Samsung, also supports Google, HTC, LG, Motorola, SONY, HUAWEI, OPPO, vivo, Xiaomi, ASUS, Nokia, etc.. More importantly, the steps used by the software are not complex. You just need to follow the instructions and work step by step.


Step 1. Launch the software and connect Samsung Galaxy Note 8/Note 9 to computer
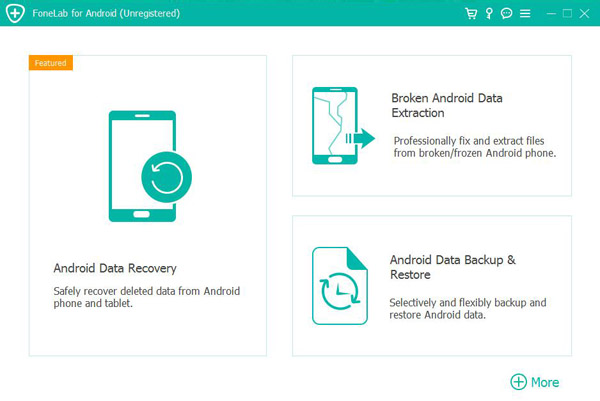
Download, install and launch the Samsung Data Recovery on your computer, then select "Android Data Recovery" from the main interface.
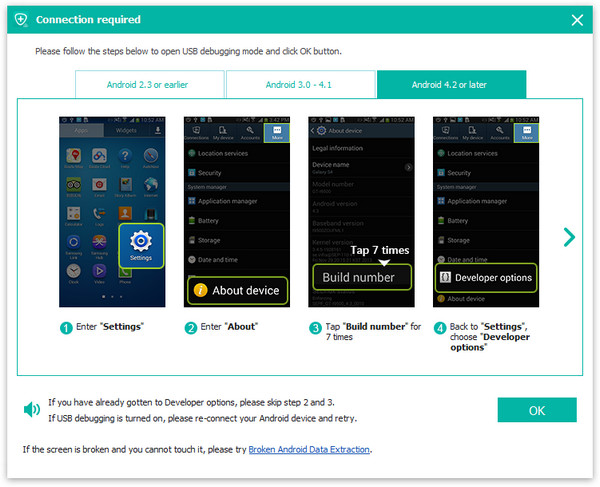
Next, please connect your Samsung Galaxy Note 8 or Samsung Galaxy Note 9 to computer via theirs USB cable, please don't forget to enable the USB debugging mode on your phone's screen.
Step 2. Select file types to scan
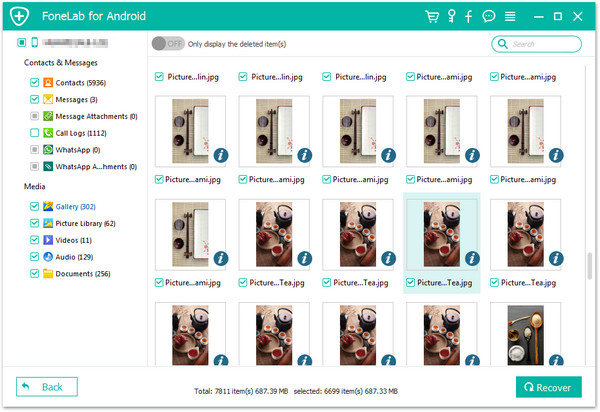
After the Samsung Galaxy Note 8/Note 9 is connected successfully, you need select the type of data that you'd like to recover. Here you can just tick the "Gallery" and "Picture Library". And then click "Next" to continue the data recovery process.

Step 3. Preview and recover the selected photos/pictures
Once the scanning is finished, all the recoverable data are displayed in different classifications. You can preview all the found pictures and photos one by one. Find the appropriate photos and pictures you want to restore and check them, and then click "Recover" to save them on your computer.
Method 2 Restore Photos/Pictures from Backup to Samsung Galaxy Note 8/Note 9
Samsung Data Recovery is undoubtedly a versatile data management software, which also allows you to backup and restore your phone data. So, if you've ever backed up your data on Samsung Galaxy Note 8/Note 9, then you can easily restore the lost photos and pictures to your Samsung Galaxy Note 8/Note 9 by using this software.
Step 1. Run Samsung Data Recovery and click "Android Data Backup & Restore" option in the primary interface.
Step 2. Use a USB cable to connect your Samsung Galaxy Note 8/Note 9 to your computer.
Step 3. Chose a features to restore your data from backup, both "Device Data Restore" and "One-click Restore" can achieve this purpose.

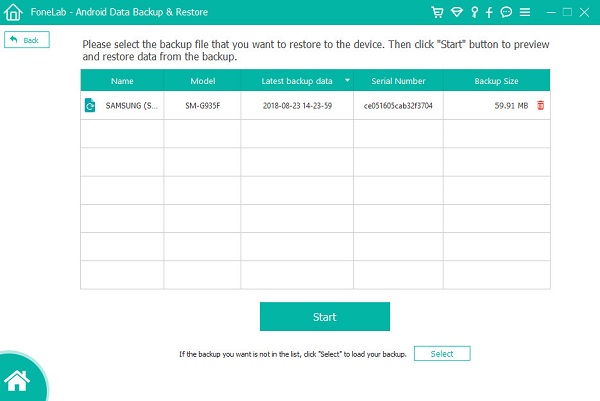
Step 4. Choose the suitable backup from the backup list, then click "Start" button to preview and restore data from the selected backup to your Samsung Galaxy Note 8/Note 9.
Method 3 Restore Photos Pictures from Backup to Samsung Galaxy Note 8/Note 9 with Kies
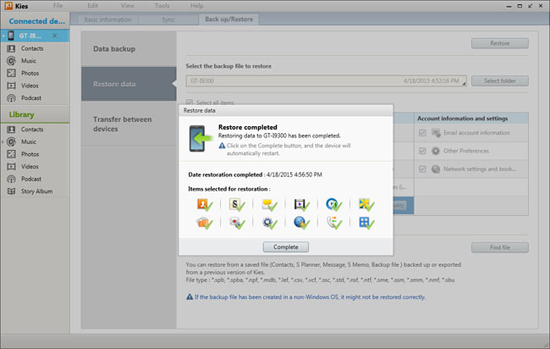
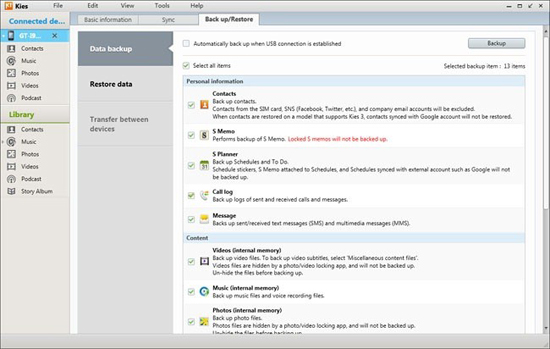
Step 1. Run Samsung Kies on your computer and connect your Samsung Galaxy Note 8 or Galaxy Note 9 to the same computer via a USB cable. After that, choose “Backup & Restore” option and click on “Restore” at the bottom of the page.
Step 2. Now, the program will automatically load the files you have backed up on this computer, choose the one according to your need.
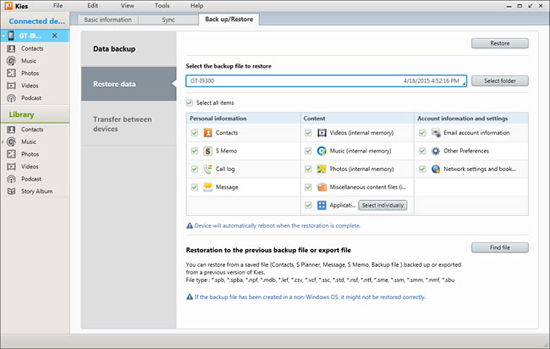
Step 3. As you can see, all the recoverable file on the selected backup file will be extracted and displayed. Browse the loaded files and tick “Photos” or any other items according to your need. Then, click the “Restore” button to start restoring your audio from backup to Samsung Galaxy Note 8/Note 9.