Overview: This article discusses from 5 aspects, and introduces users to the methods of transferring video and audio images, application programs and software data from Android or Samsung models to Xiaomi 12 Lite NE and the methods of restoring files to Xiaomi 12 Lite NE.
The Xiaomi 12 Lite NE features a 6.55 "AMOLED display with FHD+resolution and a refresh rate of 120Hz. In terms of cameras, the Xiaomi 12 Lite NE has a 32-megapixel+32-megapixel dual camera, a 50-megapixel rear main camera, a 20-megapixel ultra-wide-angle camera and a 2-megapixel macro camera. Xiaomi 12 Lite NE is equipped with Qualcomm Snapdragon 7 Gen 1 chip with 4500mAh battery and supports 67W fast charging.
It can be seen that Xiaomi 12 Lite NE has performed well in all aspects. When users experience the high performance of the Xiaomi 12 Lite NE, they will also consider the problem of data migration between devices, hoping to solve the data transmission problem on the premise of installing as few software as possible and operating as few steps as possible. At the same time, users will also hope to have software to ensure the safety of the equipment data and to retrieve the data in the event of an accident to the mobile phone. According to the needs of users, this paper recommends two software, Mobile Transfer and Android Data Recovery, with a tutorial attached.
The main function of Mobile Transfer is to realize data transfer between any Android/Samsung/Apple phones for users. Only by installing the software on the computer side and connecting the mobile phone with the computer via USB cable, files stored locally on the mobile phone, chat information such as WhatsApp/Wechat/Kik/Line/Viber software, or cached information such as calendars and memos can be transferred to the new device.


Part 1 Transfer Data from Android/Samsung to Xiaomi 12 Lite N
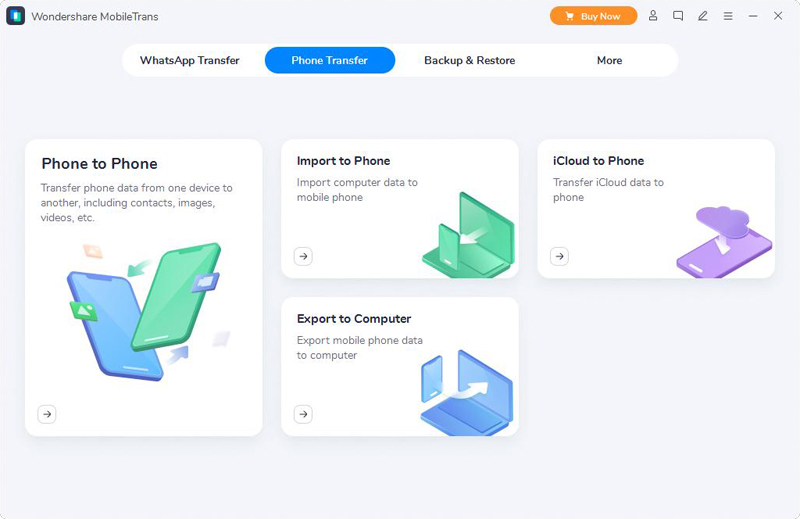
Step 1. After installing and running Mobile Transfer, click the "Phone Transfer" option on the start page of the software. Then click the "Phone to Phone" option on the new page.
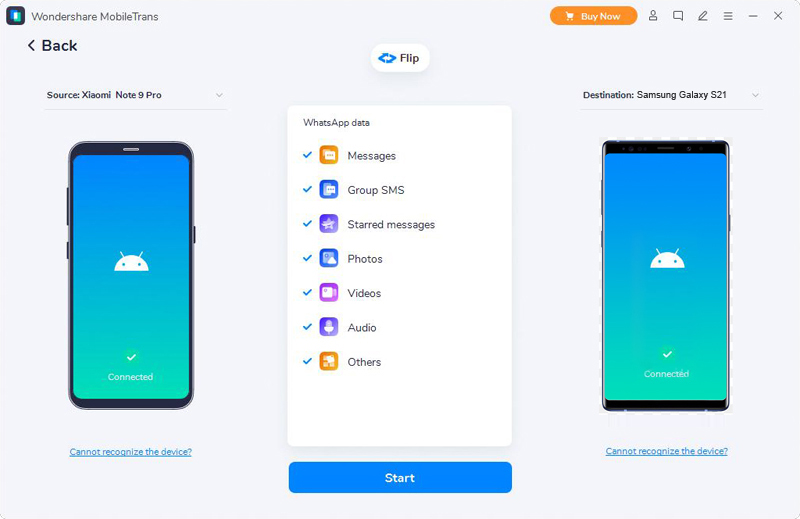
Step 2. Connect the original Android/Samsung device and Xiaomi 12 Lite NE to this computer with the USB cable.
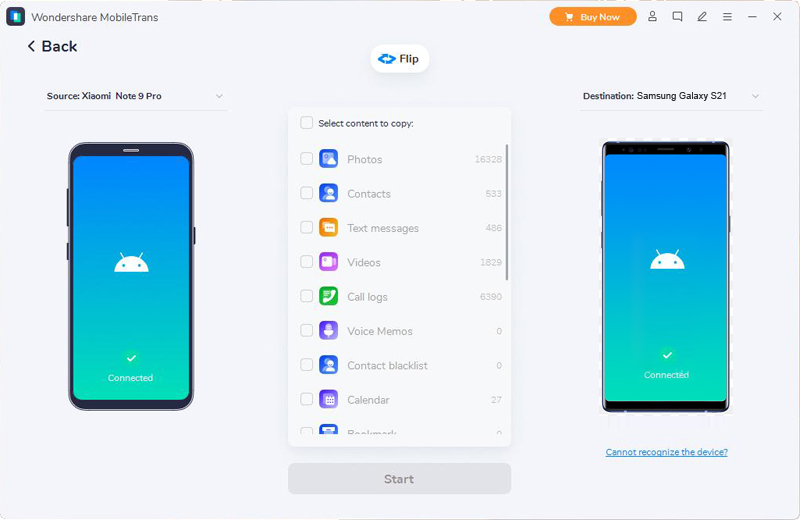
Tip: Click the "Flip" button to change the track of the Xiaomi 12lite Ne. Make sure they are on the right track (the Xiaomi 12 Lite Ne is on the destination track) to ensure that the next data transfer is successful.
Step 3. Select the data you want to sync to Xiaomi 12 Lite NE, and click "Start" to start the data syncing.

If you want to synchronize the data in the backup to Xiaomi 12 Lite NE, this article still recommends that users use Mobile Transfer. Compared with other software of the same type, Mobile Transfer has unlimited file types, fast upload/download speed and good security. Users do not have to worry about privacy disclosure.
Part 2 Sync Data from Backup to Xiaomi 12 Lite NE
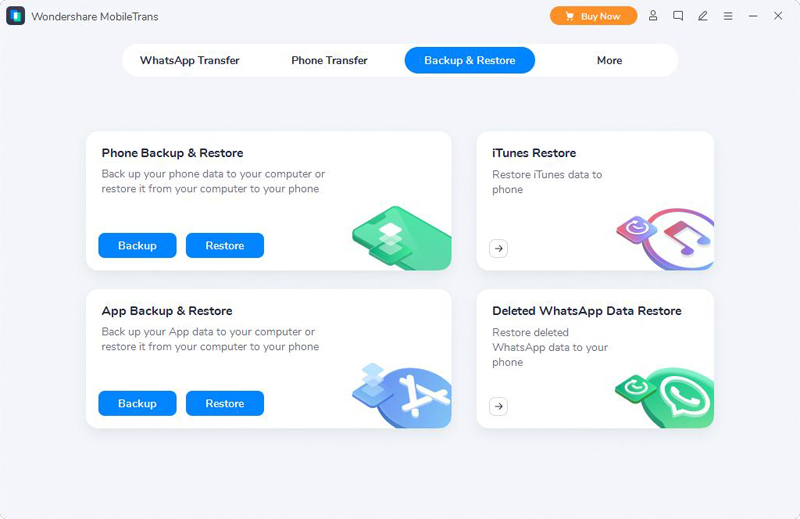
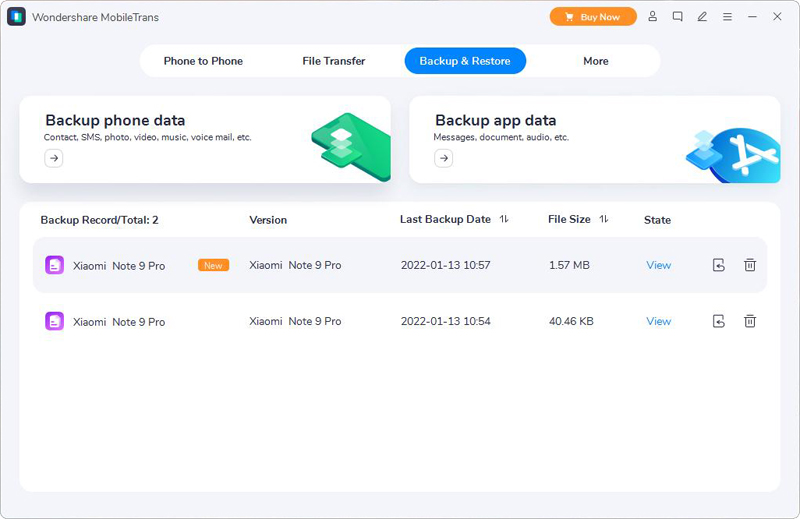
Step 1. To start the Mobile Transfer, click "Backup & Restore" on the home page, and then click "Phone Backup & Restore" , and finally click "Restore".
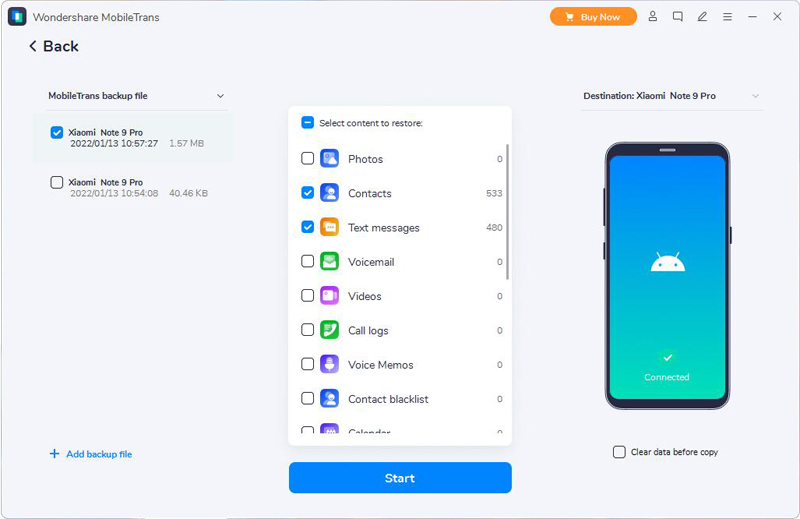
Step 2. Wait for the mobile transmission to scan the phone, and a preview list of files will be presented. Select the data to be synchronized to Xiaomi 12 Lite NE, and click "Restore".
Step 3. Connect the Xiaomi 12 Lite NE to the computer with a USB cable.
Step 4. Select the file you want and then click on "Start" to begin moving them to your Xiaomi 12 Lite NE.
Part 3 Transfer WhatsApp/Wechat/Kik/Line/Viber Messages to Xiaomi 12 Lite NE
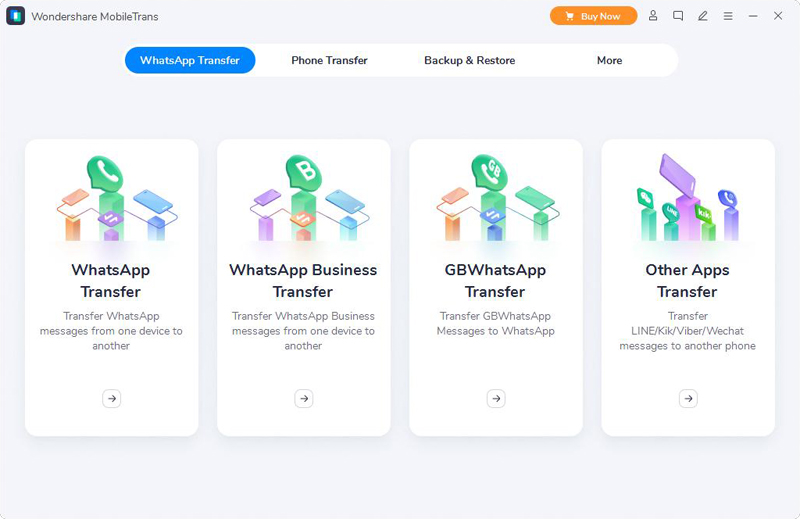
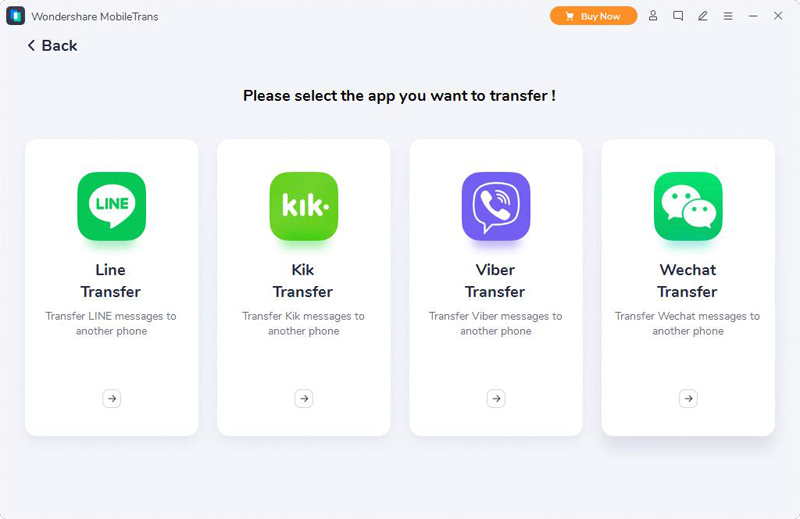
Step 1. Click "WhatsApp Transfer" at the top of the homepage of the software, and 4 options will appear: "WhatsApp Transfer", "WhatsApp business transfer", "GB WhatsApp transfer" and "Other Apps Transfer". Please select the corresponding module according to the software type.
Tip: The data on the Viber software needs to be transmitted to the computer first, and then synchronized to the mobile phone by the computer.
Step 2. Connect the Xiaomi 12 Lite NE and your old phone to the same computer with the USB cables.
Step 3. Examine the preview file list and select the data that needs to be synchronized to Xiaomi 12 Lite NE.
Step 4. If everything is ready, click the "Start" button to begin moving the needed data between your phones.
Android Data Recovery, just as its name implies, is a software specially designed for mobile phone data recovery. Start the software, which will automatically identify and detect the Xiaomi 12 Lite NE after it is connected to the computer, perform in-depth scanning on it, and mine mobile phone files. Android Data Recovery can also complete file scanning when the mobile phone cannot be used normally, and has good recovery effect on deleted files.
Part 4 Recover Data from Xiaomi 12 Lite NE without Backup
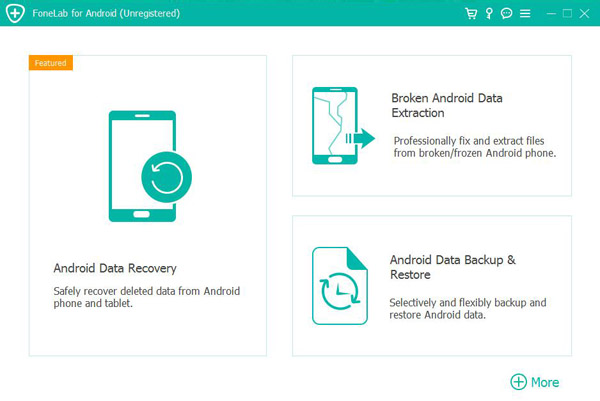
Step 1. Start Android Data Recovery and click the "Android Data Recovery" module on the homepage.
Step 2. Connect your Xiaomi 12 Lite NE to the computer via a USB cable.
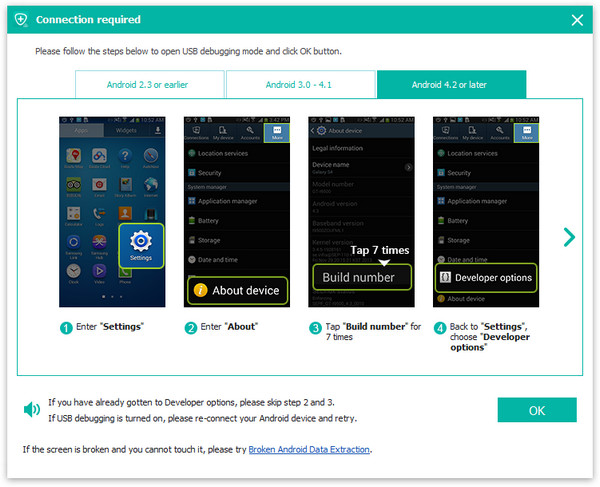
Tip: If your Xiaomi 12 Lite NE is already connected to the computer, but the software cannot identify it successfully, please move the cursor to the "Device is connected and the program has not responded for a long time" in the blue font below? Click View Help to re-establish the connection according to the methods shown.
Step 3. Select the scan path you want and click the "Next" key to start scanning Deleted/Lost Data in the device.

Tip: "In-depth scanning" can find those files that are more hidden, but correspondingly takes longer. If normal scanning cannot retrieve the missing/deleted files, you can click this option and wait patiently.
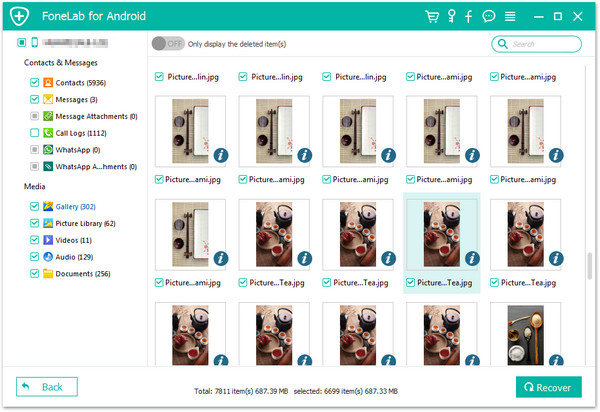
Step 4. After the scan, check the data retrieved by the software and click "Recover" to synchronize them to Xiaomi 12 Lite NE.
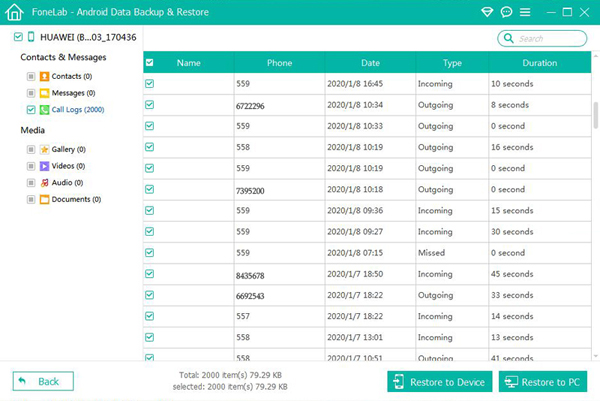
Part 5 Restore Data from Backup to Xiaomi 12 Lite NE
Step 1. Start Android Data Recovery and select the Android Data Backup & Restore module on the initial page.
Step 2. Connect the Redmi A1 to the computer with the USB cable, and click "Device Data Restore".

Step 3. Wait for the program to recognize Xiaomi 12 Lite NE, and click on "Start".
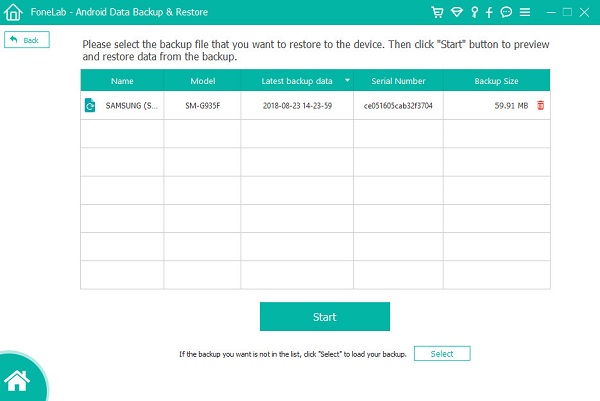
Step 4. After the scanning has been completed, select the data you want and finally click on "Restore to Device".