Overview: This is an useful article that will tells you the best ways to transfer all data from iPhone/Samsung/Android device to Samsung Galaxy A02/A02s, and telling the most simple ways to restore deleted and lost data from Samsung Galaxy A02/A02s. Pleaes don't miss it if you also looking for the similar tutorial.
Samsung Galaxy A02 is equipped with Snapdragon 450 SoC composed of Adreno 506 GPU, running on Android 10 operating system and 2GB RAM. It uses a 5.7-inch display waterdrop notch design, equipped with a 13-megapixel main camera and a 2-megapixel depth sensor dual rear camera, as well as an 8-megapixel front camera. As for the Samsung Galaxy A02s, it is equipped with a Qualcomm Snapdragon 450 processor, a 6.5-inch high-definition TFT display, 3GB RAM + 32GB internal storage space, and a 13MP + 2MP + 2MP triple rear camera combination. As for the Samsung Galaxy A02s, it is equipped with a Snapdragon 450 processor, and is equipped with 3GB of running memory, the operating system is Android 10, and it is equipped with a 5000mAh battery. In terms of cameras, a combination of rear 13MP + 2MP + 2MP triple cameras and 8MP front cameras are adopted.
There is no doubt that as two entry-level smartphones, the configuration will certainly not have too amazing performance, but the overall price-performance ratio is still relatively high. For users who do not require high configuration requirements, this is undoubtedly a good choice. Since there is a user market, there must be user needs, so next we will talk about how to quickly transfer your phone data to Samsung Galaxy A02/A02s, and how to effectively recover deleted and lost data from Samsung Galaxy A02/A02s.
- Part 1 Directly Transfer Data from Samsung/Android to Samsung Galaxy A02/A02s
- Part 2 Transfer Data from Backup File to Samsung Galaxy A02/A02s
- Part 3 Directly Recover Data from Samsung Galaxy A02/A02s without Backup
- Part 4 Restore Data from Backup to Samsung Galaxy A02/A02s
- Part 5 Restore Samsung Kies Backup to Samsung Galaxy A02/A02s
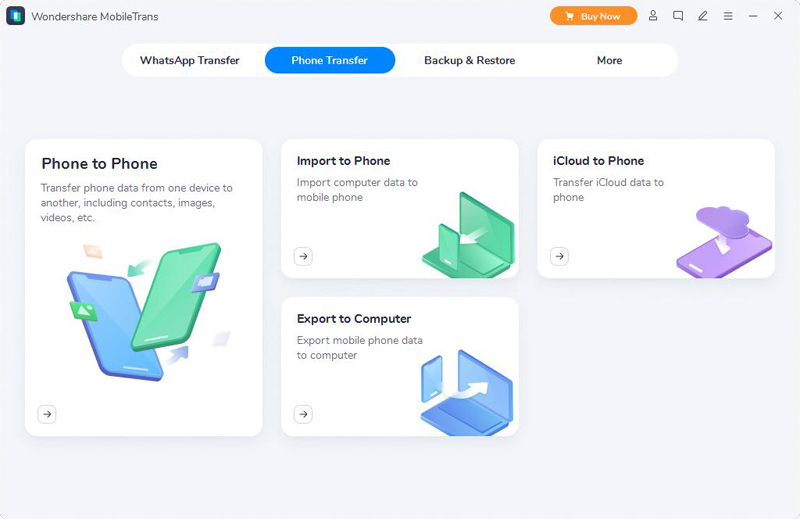
Part 1 Directly Transfer Data from Samsung/Android to Samsung Galaxy A02/A02s
No matter you were using Samsung or other Android phone before, once you buy a Samsung Galaxy A02 or Samsung Galaxy A02s to replace your old phone, the first thing you need to do is transferring all data from the old phone to Samsung Galaxy A02/A02s, so that you can use the new phone as soon as possible. There is no shortcut to success, but there is a shortcut for data transfer, that is the Mobile Transfer.
Mobile Transfer also named as Phone to Phone Transfer, as the name suggests, it can help to transfer all data from phone to phone. In other words, you are allowed to transfer contacts, text messages, music, photos, videos, call logs, calendar, Apps, App data and more data from any Samsung/Android devices to Samsung Galaxy A02/A02s via this Mobile Transfer software. The specific steps are as follows:


Step 1: Download, install and run the Mobile Transfer software on your computer, then choose the "Phone to Phone Transfer" mode and click on "Start" to go on.
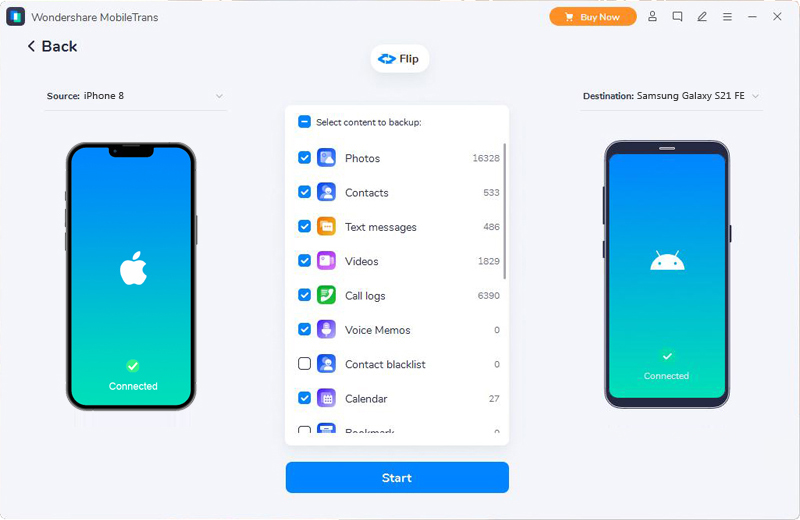
Step 2: Connect both of your old Samsung/Android devices and Samsung Galaxy A02/A02s to the same computer by using their USB cables. The program will detects them soon and display them on the both sides of the interface, please use the Flip button to distinguish the source device and target device.
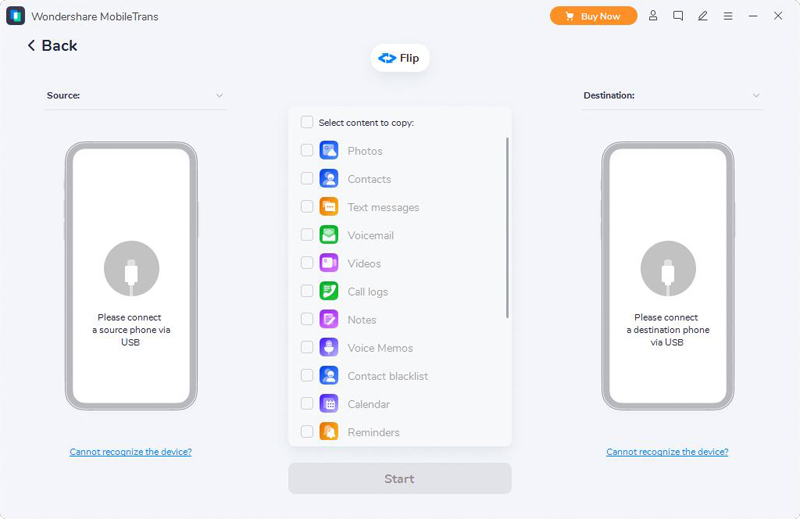
Step 3: After confirming the location of your phone is correct, select the file types that you want to transfer, then click on "Start Transfer" to sync them to your Samsung Galaxy A02/A02s.
Tips: The progress of data migration depends on the amount of data to be transferred. Please be patient and don’t disconnect your phones. If you want to erase all data on your Samsung Galaxy A02/A02s before transferring data, please check the "Clear data before copy" option.
Part 2 Transfer Data from Backup File to Samsung Galaxy A02/A02s
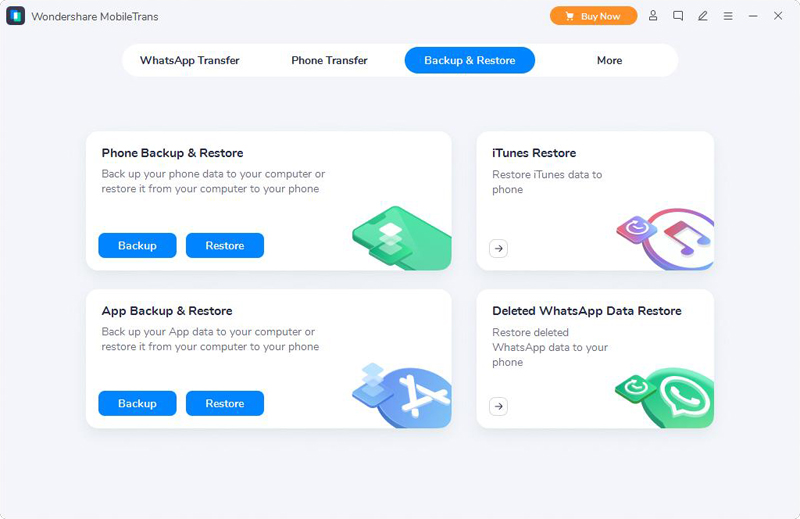
Mobile Transfer can also back up your phone data, and extracting to restore data from backup file to any supported devices. So, if you have ever backed up your phone data using Mobile Transfer, or get a backup file that supported by Mobile Transfer, then you can follow the below steps to try syncing your data to Samsung Galaxy A02/A02s.
Step 1: Return to the primary interface of Mobile Transfer, then click on "Restore from Backups" and choose "MobileTrans" or "Kies". The difference between these two options is the software used for the backup.
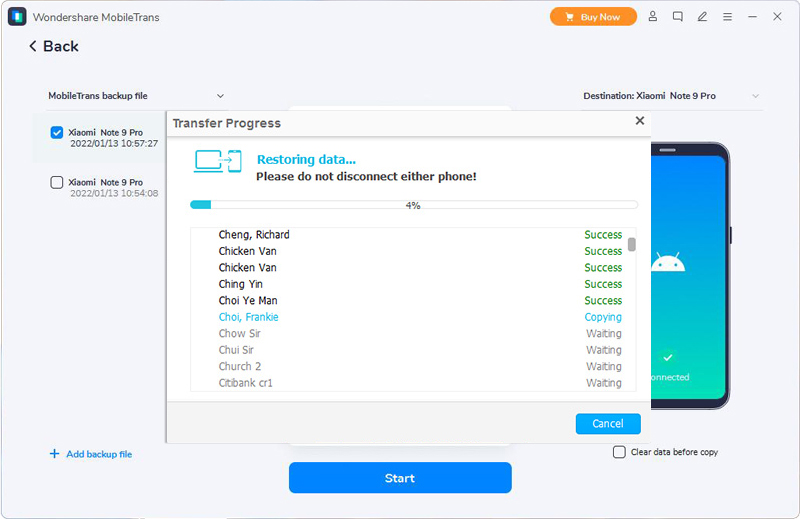
Step 2: Choose a backup file from the list to extract all the transferable data, and connect your Samsung Galaxy A02/A02s to computer.
![]()
Step 3: When your phone is detected, after selecting the files you need, tap on "Start Transfer" to move the selected data to your Samsung Galaxy A02/A02s.
Part 3 Directly Recover Data from Samsung Galaxy A02/A02s without Backup
In the process of daily use, there are so many scenarios that can cause data loss on your Samsung Galaxy A02/A02s, such as accidental deletion, system crash, forgotten password, SD card issue, factory reset, rooting error and so on. No matter what you've lost and how they lost, you only care about whether the lost data can be recovered, and is there any effective and reliable data recovery method, right? Fret not, Samsung Data Recovery is your data savior.
Samsung Data Recovery is a data and system recovery software recognized by users, it has a professional and complete solution. The reason why Samsung Data Recovery can stand out among many data recovery softwares is due to its strong compatibility. Samsung Data Recovery not only supports almost all common data types, including contacts, text messages, call logs, audio, photos, videos, WhatsApp messages, documents and so on, but also applies to almost all types of Samsung Galaxy devices. So, it's a piece of cake for Samsung Data Recovery to restore deleted and lost data on your Samsung Galaxy A02/A02s.
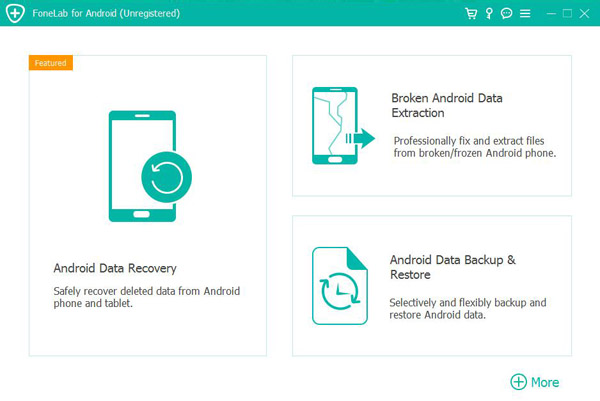
Step 1: Download, install and launch Samsung Data Recovery on your computer, then click on "Android Data Recovery" on the homepage.
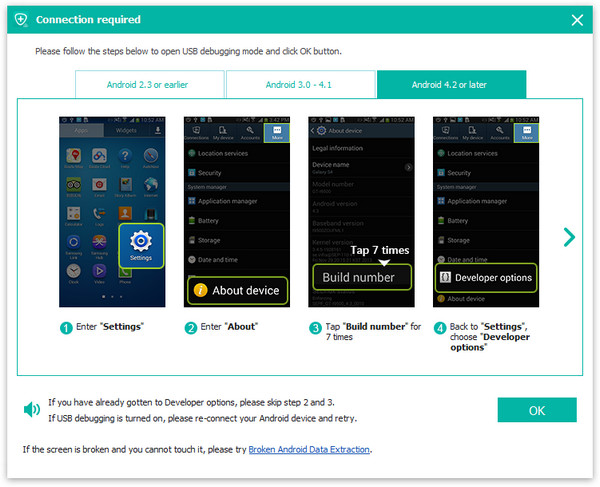
Step 2: Use a USB cable to connect your Samsung Galaxy A02/A02s to computer, then follow the prompts to establish a connection and enable the USB debugging mode, if done, tap on "OK".
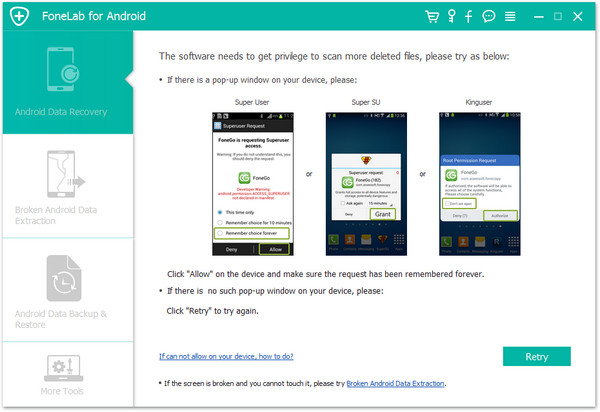
Step 3: When your phone is recognized, please select the file types that you wanting to scanned and restored, then click on "Next" to begin analyze and scan your device under the Standard Scan mode.

Tips: During this process, please pay attention to the prompt information on the software interface and the screen of your mobile phone. This is the key to scanning the data you need. Please follow the prompts to complete the relevant operations.
Step 4: Wait for the scan to finish, you can see all the found data will be displayed, after selecting and confirming those what you wanted, and click on "Recover" to save them back to your computer.
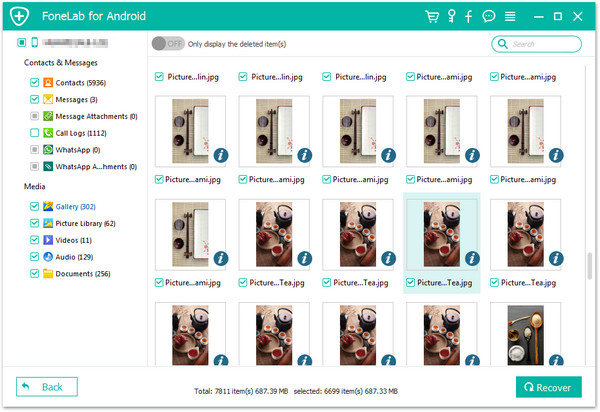
Tips: In the Standard Scan mode, the scanning efficiency is higher, but some hidden data may not be found. If you cannot find the data you need, don't worry, you can choose the Deep Scan mode and try again.
Part 4 Restore Data from Backup to Samsung Galaxy A02/A02s
Samsung Data Recovery also has excellent backup and restore backup functions. With help of this software, you can easily restore data from previous backup file to any supported Android devices.
Step 1: Return to the homepage of Samsung Data Recovery software, and click on "Android Data Backup & Restore".
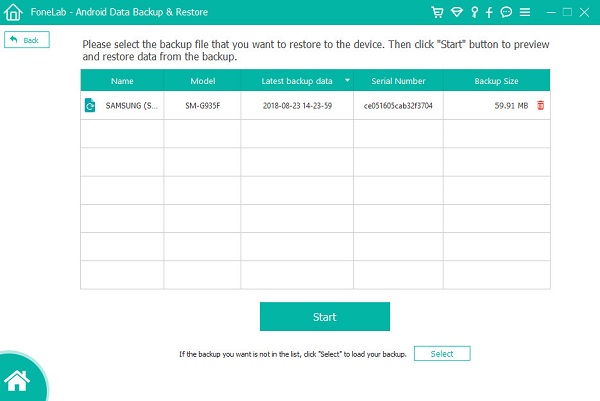
Step 2: Connect your Samsung Galaxy A02/A02s to computer, and choose a restore option as you like, either "One-click Restore" or "Device Data Restore".

Step 3: Choose a backup file from the list, and press "Start" to extract all the files that can be restored from the selected backup file.
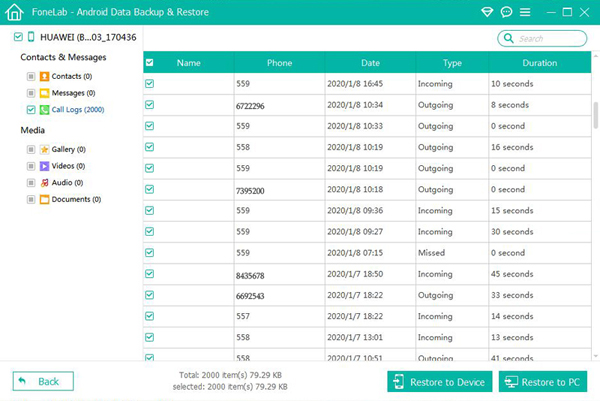
Step 4: Select the files you need, and click on "Restore to Device" to restore them to your Samsung Galaxy A02/A02s, or click on "Restore to PC" to save them back to your computer.
Part 5 Restore Samsung Kies Backup to Samsung Galaxy A02/A02s
If you have ever backed up your Samsung phone data with Samsung Kies, then you can also restore data from Kies backup file to your Samsung Galaxy A02/A02s.
Step 1: Run Samsung Kies, and connect your Samsung Galaxy A02/A02s to computer via its USB cable.
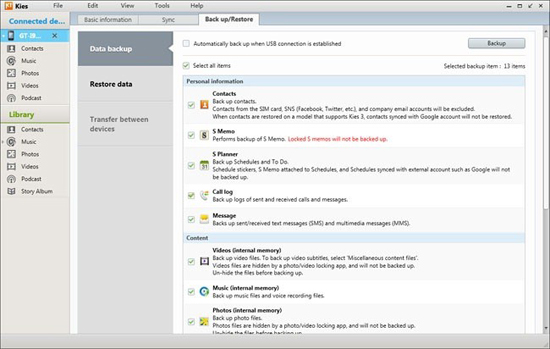
Step 2: When your device is recognized, please tap on the “Back up/Restore” option in the top menu bar of the software interface. Then scroll down until you find and click the "Restore" button.
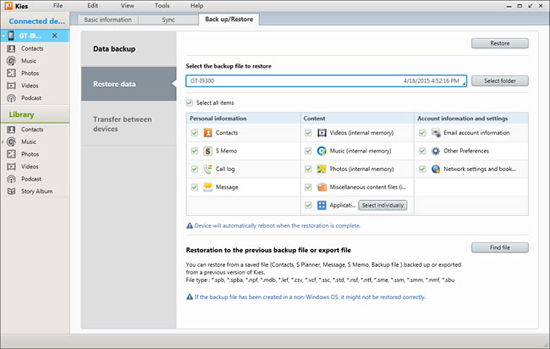
Step 3: Select a backup file from the list and click on "Next".
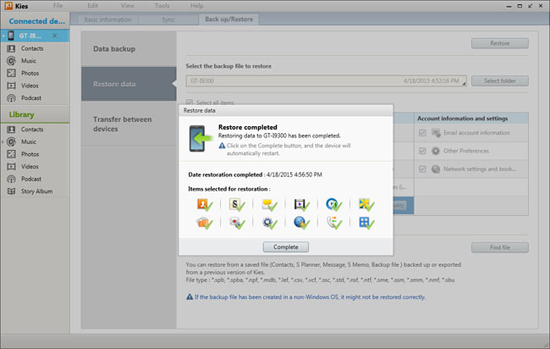
Step 4: Choose the file types that you want to recover, and click on "Next" after confirmation to begin restoring the selected data to your device.