Overview: This article will provides users with specific solutions on how to transfer and restore data in Samsung Galaxy S20 FE/S20 FE Lite/S20/S20+/S20 Ultra according to different needs, and telling how to export data from Samsung Galaxy S20 FE/S20 FE Lite/S20/S20+/S20 Ultra to computer with ease. If you are also interested in this, don't miss it.
Samsung Galaxy S20 FE 5G uses a 6.5-inch Super AMOLED flat screen with FHD+ resolution and 120Hz refresh rate screen. The configuration is still equipped with Qualcomm Snapdragon 865 processor, 8GB LPDDR5 + 128/256GB of storage combination, and supports up to 1TB space expansion, built-in 4500mAh super-capacity smart battery, wired fast charging speed of 25W. The Samsung Galaxy S20 FE 5G has a rear three-camera lens module. Among the three main lenses, there are a 12-megapixel main lens, a 12-megapixel ultra-wide-angle lens, and an 8-megapixel telephoto lens. In addition, Samsung will also release a Samsung Galaxy S20 FE Lite at the same time, except for the processor, its other specifications are basically unchanged.
Samsung Galaxy S20 series includes Galaxy S20, Galaxy S20+, Galaxy S20 Ultra three mobile phones, all adopt the same middle-opening super sensory full-screen (AMOLED) as the Note 10 series, 2K resolution and support 120Hz high refresh rate, the surface is The sixth-generation Gorilla Glass has screen sizes of 6.2 inches, 6.7 inches, and 6.9 inches. In terms of configuration, the Samsung Galaxy S20 series is equipped with a Qualcomm Snapdragon 865 processor and is paired with an X55 baseband to support SA/NSA dual-mode 5G networks and Wi-Fi 6 networks. All Galaxy S20 series are equipped with Samsung LPDDR5 large memory as standard. Samsung Galaxy S20 and Galaxy S20+ support up to 12GB of running memory, and Galaxy S20 Ultra supports up to 16GB of running memory.
As for the front camera, the Galaxy S20 and Galaxy S20+ both use a 10-megapixel camera, while the Galaxy S20 Ultra uses a 40-megapixel camera. In terms of rear cameras, the Galaxy S20 has three rear cameras with a 12-megapixel main camera + 64-megapixel telephoto lens and a 12-megapixel ultra-wide-angle lens. Galaxy S20+ adds a ToF depth-of-field lens to the Galaxy S20, which supports 3x optical zoom and 30x ultra-high resolution zoom. Galaxy S20 Ultra is equipped with a four-camera combination of 108 million pixel main camera + 48 million pixel periscope telephoto lens + 12 million pixel ultra-wide-angle lens + ToF depth-of-field lens, and supports 10x optical zoom and Space Zoom 100x digital zoom.
It is worthy of being Samsung's flagship mobile phone. No matter in terms of appearance, color matching, or configuration, the Samsung Galaxy S20 series are impeccable. Have you not been able to resist buying this flagship phone to replace your old Samsung phone, or other Android phones, or even iPhone? This is human nature. No matter what the reason you bought Samsung Galaxy S20 FE/S20 FE Lite/S20/S20+/S20 Ultra, we will follow the three directions of data migration, data recovery and data backup to introduce different methods to help you solve the problems encountered in the process of using the Samsung Galaxy S20 series.
Part 1 Transfer Data to Samsung Galaxy S20 FE/S20 FE Lite/S20/S20+/S20 Ultra
- Restore Data from Samsung Cloud to Samsung Galaxy S20 FE/S20 FE Lite/S20/S20+/S20 Ultra
- Transfer Data from Android to Samsung Galaxy S20 FE/S20 FE Lite/S20/S20+/S20 Ultra
- Transfer Data from Samsung to Samsung Galaxy S20 FE/S20 FE Lite/S20/S20+/S20 Ultra
- Transfer Data from iPhone to Samsung Galaxy S20 FE/S20 FE Lite/S20/S20+/S20 Ultra
- Sync Data from Backup to Samsung Galaxy S20 FE/S20 FE Lite/S20/S20+/S20 Ultra
- Sync Data to Samsung Galaxy S20 FE/S20 FE Lite/S20/S20+/S20 Ultra with Smart Switch
Part 2 Restore Data from Samsung Galaxy S20 FE/S20 FE Lite/S20/S20+/S20 Ultra
- Restore Data from Samsung Cloud to Samsung Galaxy S20 FE/S20 FE Lite/S20/S20+/S20 Ultra
- Restore Data from Kies Backup to Samsung Galaxy S20 FE/S20 FE Lite/S20/S20+/S20 Ultra
- Recover Data on Samsung Galaxy S20 FE/S20 FE Lite/S20/S20+/S20 Ultra without Backup (Recommended)
- Extract Data from Backup and Restore to Samsung Galaxy S20 FE/S20 FE Lite/S20/S20+/S20 Ultra
- Recover Data on Samsung Galaxy S20 FE/S20 FE Lite/S20/S20+/S20 Ultra with Best Data Recovery
Part 3 Back Up on Samsung Galaxy S20 FE/S20 FE Lite/S20/S20+/S20 Ultra
- Back Up Samsung Galaxy S20 FE/S20 FE Lite/S20/S20+/S20 Ultra to Samsung Cloud
- Back Up Samsung Galaxy S20 FE/S20 FE Lite/S20/S20+/S20 Ultra with Samsung Kies
- Back Up Samsung Galaxy S20 FE/S20 FE Lite/S20/S20+/S20 Ultra with Mobile Transfer
- Back Up Samsung Galaxy S20 FE/S20 FE Lite/S20/S20+/S20 Ultra with Android Data Backup & Restore
With the continuous improvement of mobile phone performance, it is not a new thing for users to change mobile phones. Whenever we change mobile phones, the first thing to do is to transfer massive amounts of user data. I believe you won't refute, right? If you just become the owner of Samsung Galaxy S20 FE/S20 FE Lite/S20/S20+/S20 Ultra, you must be interested in how to easily transfer all data from your old phone to new phone, next, we will introduce several simple and fast methods to help you solve this problem.
Part 1 Transfer Data to Samsung Galaxy S20 FE/S20 FE Lite/S20/S20+/S20 Ultra
Restore Data from Samsung Cloud to Samsung Galaxy S20 FE/S20 FE Lite/S20/S20+/S20 Ultra
Samsung provides 15GB of free storage for each Samsung Clone account to sync/back up data, so, for old Samsung Galaxy device users, if you've ever backed up your phone data to Samsung Cloud, then you can follow the below steps to restore data from Samsung Cloud backup back to your Samsung Galaxy S20 FE/S20 FE Lite/S20/S20+/S20 Ultra.
- Step 1. Unlock your Samsung Galaxy S20 FE/S20 FE Lite/S20/S20+/S20 Ultra, then go to "Settings", tap on "Accounts and backup".
- Step 2. Then tap on "Backup and restore" > "Restore data".
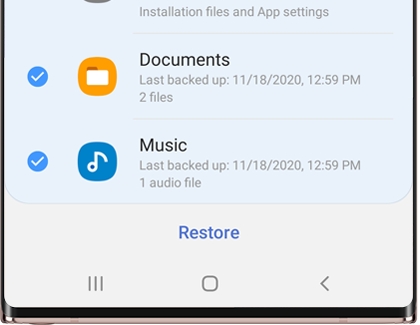
- Step 3. Select your desired device(backup file), and then select the content you want to restore.
- Step 4. Next, click on "Restore" to restore the selected data to your Samsung Galaxy S20 FE/S20 FE Lite/S20/S20+/S20 Ultra.
Tips: If needed, follow the on-screen instructions to download your backup data.
Sync Data from Backup to Samsung Galaxy S20 FE/S20 FE Lite/S20/S20+/S20 Ultra
In this method, you need to use a software named Mobile Transfer, which not only allows you to directly transfer data from phone to phone, but also can help you to restore data from backup to any supported devices. So, if you have ever backed up your phone data by using this software, or you get a backup file that supported by this software, then you can use this software to restore data from backup to your Samsung Galaxy S20 FE/S20 FE Lite/S20/S20+/S20 Ultra. Next, we will take restoring data from MobileTrans/Kies/iTunes/iCloud backup file as the example to show how to use this software.


Before using this software, please download and install the corresponding version of Mobile Transfer on your computer firstly.
Sync Data from MobileTrans/Kies Backup:
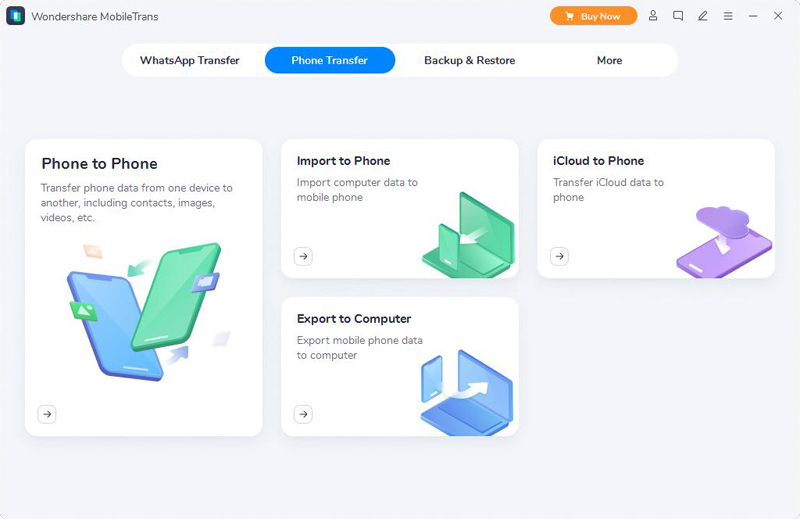
Step 1. Run Mobile Transfer, then click on "Restore from Backups" and select "MobileTrans" or "Kies".
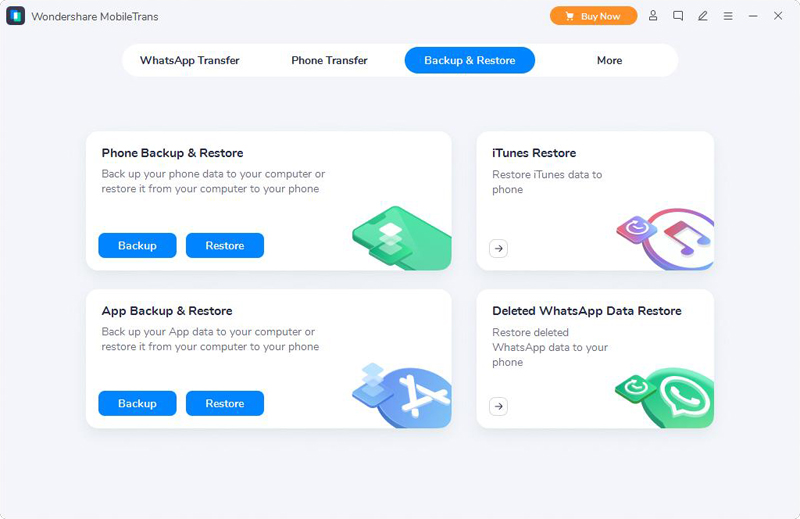
Tips: No matter what phone you were used before, as long as you used the Mobile Transfer to back up your phone data, and save the backup file on your computer, then you can choose "MobileTrans". If you are an old Samsung user, and have ever backed up your old Samsung phone with Samsung Kies, and save the backup file on your computer, then you can choose "Kies" here.
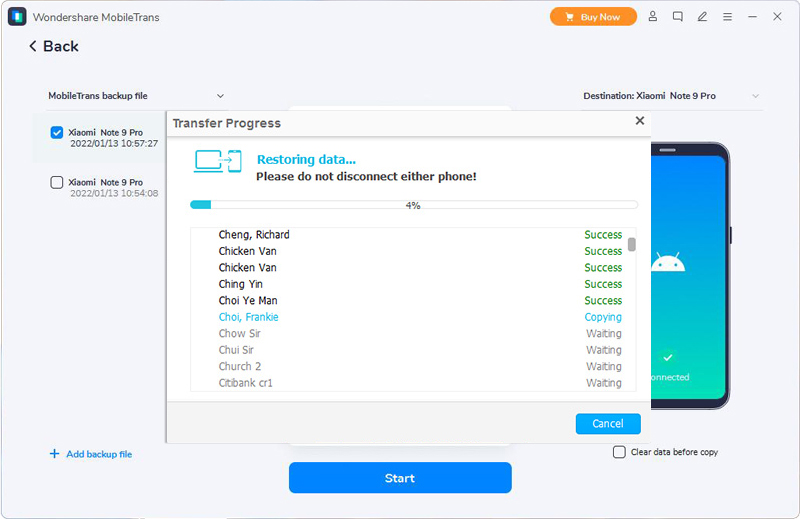
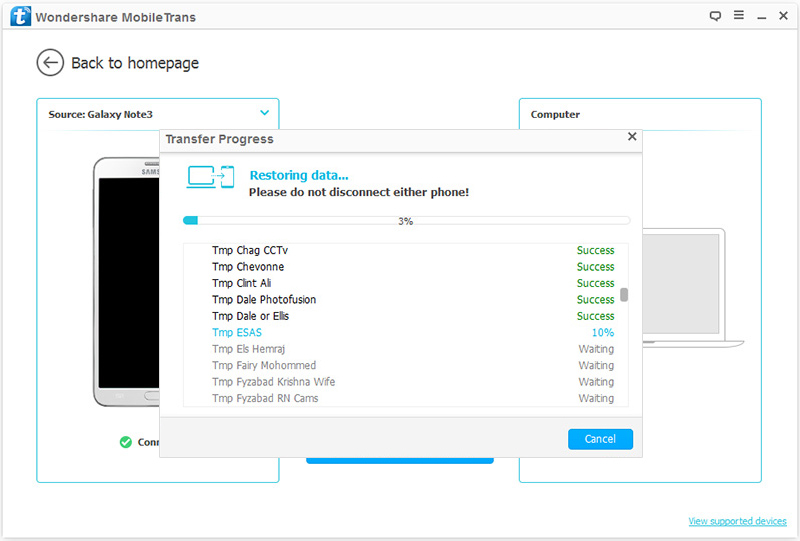
Step 2. Connect your Samsung Galaxy S20 FE/S20 FE Lite/S20/S20+/S20 Ultra to computer via a USB cable, and choose a backup file from the list of the left panel of the page.
![]()
Step 3. Once your phone is detected, select the file types as your need, then click on "Start Transfer" to sync them to your Samsung Galaxy S20 FE/S20 FE Lite/S20/S20+/S20 Ultra.
If your old phone is an iPhone, or you have an iPad, and you have ever synced your iPhone/iPad with iTunes or iCloud, then you can follow the below steps to transfer your data to Samsung Galaxy S20 FE/S20 FE Lite/S20/S20+/S20 Ultra.
Sync Data from iTunes Backup:
Step 1. Return to the homepage of Mobile Transfer, then click on "Restore from Backups" > "iTunes".
Step 2. Choose an iTunes backup file from the list, and connect your Samsung Galaxy S20 FE/S20 FE Lite/S20/S20+/S20 Ultra to computer via a USB cable.
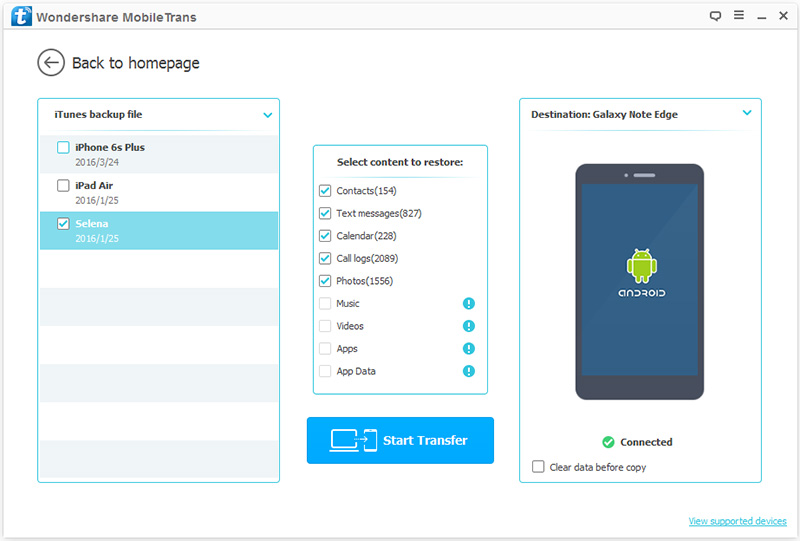
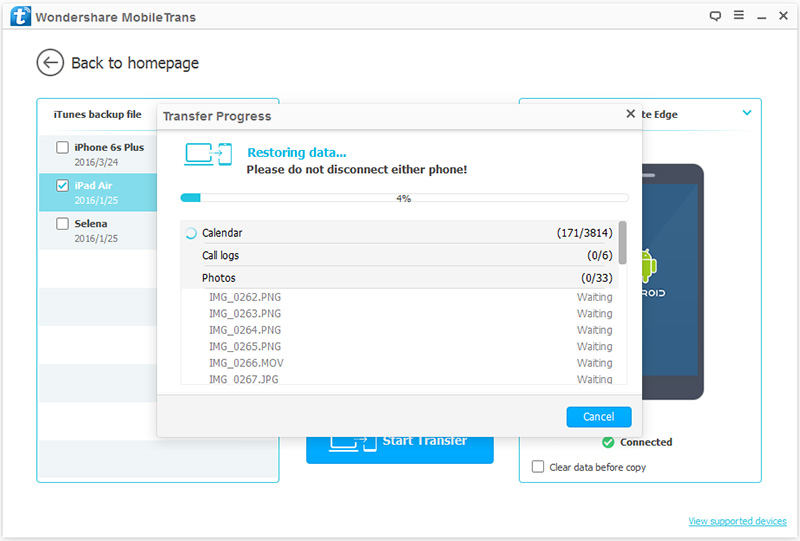
Step 3. Once your device is recognized, select the file types according to your need, then click on "Start Transfer" to sync them to your Samsung Galaxy S20 FE/S20 FE Lite/S20/S20+/S20 Ultra.
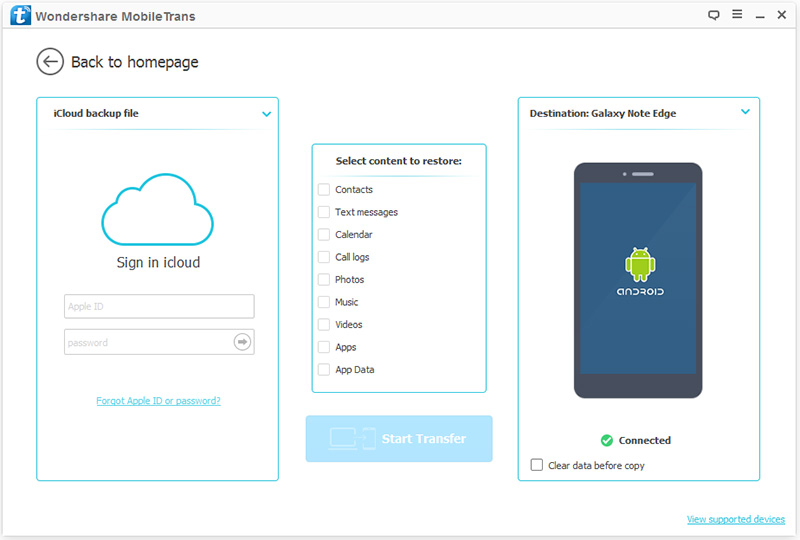
Sync Data from iCloud Backup:
Step 1. Return to the homepage of Mobile Transfer, then click on "Restore from Backups" > "iCloud".
Step 2. Sign in to your iCloud account which was used to back up your iPhone/iPad data on the software's page, and connect your Samsung Galaxy S20 FE/S20 FE Lite/S20/S20+/S20 Ultra to computer.
Step 3. After logging in, all the backup files will be listed, choose the most suitable one and click "Download" to download it to your computer.
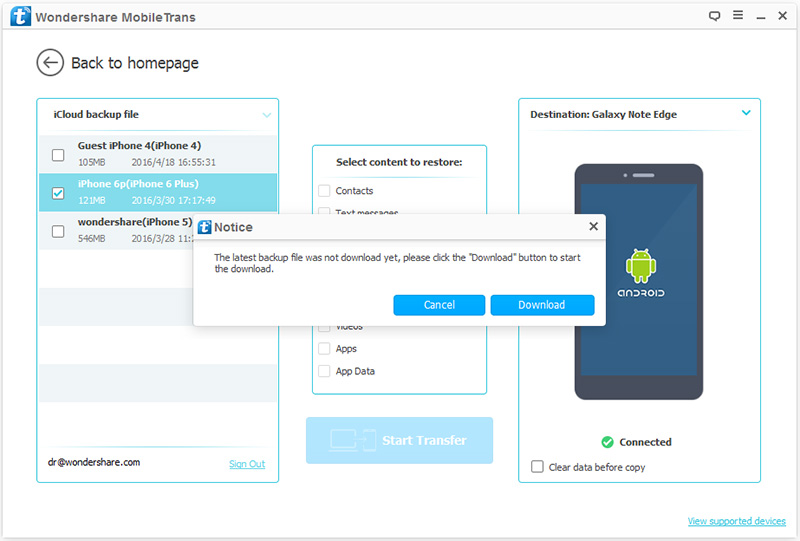
Step 4. When the download is finish, all the transferable file types will be listed in the middle panel of the page, then click on "Start Transfer" to sync them to your Samsung Galaxy S20 FE/S20 FE Lite/S20/S20+/S20 Ultra.
Tips: No matter which the above method you choose, if you want to completely wipe all data on your Samsung Galaxy S20 FE/S20 FE Lite/S20/S20+/S20 Ultra before transferring data, you can mark the checkbox near the "Clear data before copy" option.
Sync Data to Samsung Galaxy S20 FE/S20 FE Lite/S20/S20+/S20 Ultra with Smart Switch
Samsung Smart Switch is a mobile application specially created by Samsung for its users to transfer data between different phones, so you can follow the below steps to transfer data from your old phone to Samsung Galaxy S20 FE/S20 FE Lite/S20/S20+/S20 Ultra.
Transfer Data from Old Android/Samsung Device:
- Step 1. Download and install the Samsung Smart Switch on both of your old phone and the Samsung Galaxy S20 FE/S20 FE Lite/S20/S20+/S20 Ultra, and plug them into their chargers.
- Step 2. Run the Smart Switch on your Samsung Galaxy S20 FE/S20 FE Lite/S20/S20+/S20 Ultra, then tap on "Receive data" > "Wireless", and select the type of your old phone.
- Step 3. Run the Smart Switch on your old Android/Samsung phone, then tap on "Send data" > "Wireless", then tap on "Allow" to establish the connection between your old and new phones.
- Step 4. Select the file types you want to transfer on your Samsung Galaxy S20 FE/S20 FE Lite/S20/S20+/S20 Ultra, then tap on "Transfer" to begin the transfer process. If done, click on "Done".
Transfer Data from iCloud Account:
- Step 1. Run the Smart Switch on your Samsung Galaxy S20 FE/S20 FE Lite/S20/S20+/S20 Ultra, then tap on "Receive data" > "Wireless" and select "iPhone/iPad".
- Step 2. Enter your Apple ID and password to sign in to your iCloud account which was used to back up your iPhone/iPad data. If necessary, please enter the verification code that have been sent to your corresponding iPhone/iPad, and press "OK".
- Step 3. Select the files you want to transfer, then tap on "Import", and tap on "Import" again to sync the selected files to your Samsung Galaxy S20 FE/S20 FE Lite/S20/S20+/S20 Ultra.
Compared with data transfer, users seem to have a higher voice for data recovery. Even with such an excellent Samsung Galaxy S20 FE/S20 FE Lite/S20/S20+/S20 Ultra, it is inevitable to lose some important data during daily use. No matter your data lost due to accidental deletion, improper handling, SD card issue, forgotten password or other reasons, we believe the following simple and effective methods can help you solve this problem.
Part 2 Restore Data from Samsung Galaxy S20 FE/S20 FE Lite/S20/S20+/S20 Ultra
Restore Data from Kies Backup to Samsung Galaxy S20 FE/S20 FE Lite/S20/S20+/S20 Ultra
Samsung Kies is a data management software specially created by Samsung, if you have ever backed up your Samsung phone data with Samsung Kies, and saved the backup file in your computer, then you can use this method.
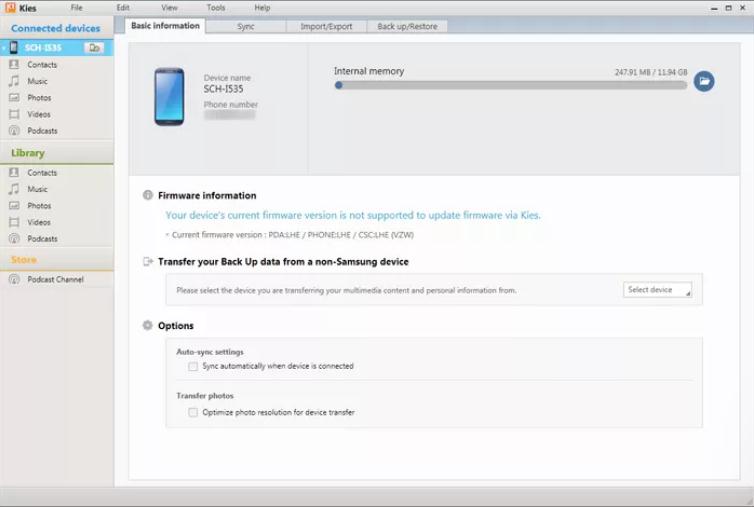
Step 1. Run Samsung Kies on your computer, and use a USB cable to connect your Samsung Galaxy S20 FE/S20 FE Lite/S20/S20+/S20 Ultra to your computer.
Step 2. Wait for your device to detect, tap the "Back up/Restore" option in the menu bar on the right side of the page. Then scroll down to find and click the "Restore" button.
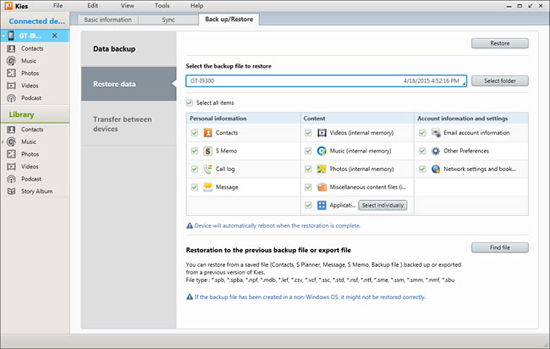
Step 3. Choose a Kies backup from the list and press "Next".
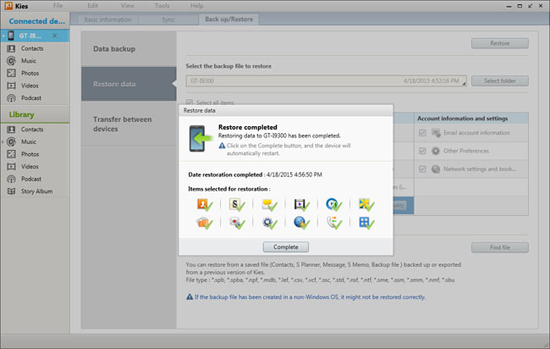
Step 4. Select the file types and settings as you need, and click on "Next" to begin restoring the selected data to your Samsung Galaxy S20 FE/S20 FE Lite/S20/S20+/S20 Ultra. If done, press "Complete".
Recover Data on Samsung Galaxy S20 FE/S20 FE Lite/S20/S20+/S20 Ultra without Backup
For the vast majority of users, the ones who are distressed by the loss of data are that there is no backup file. In fact, to recover deleted and lost data from your Samsung Galaxy S20 FE/S20 FE Lite/S20/S20+/S20 Ultra without backup, you just need the Samsung Data Recovery.
As the name suggested, Samsung Data Recovery is suitable for almost all Samsung Galaxy phones and Galaxy Tabs, to recover deleted and lost data including contacts, text messages, photos, videos, call logs, audio, WhatsApp messages, documents and more directly or from a backup file. More importantly, although it is a professional data recovery software, its operation is very simple, and the recovery efficiency is very high, and it will not leak or damage any user data. Now, please click to download and install this software on your computer, and follow the below steps to try restoring your lost and deleted data on Samsung Galaxy S20 FE/S20 FE Lite/S20/S20+/S20 Ultra without backup.
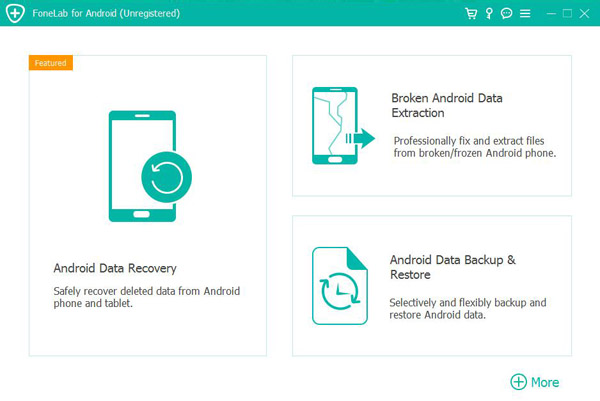
Step 1. Run the software, then click on "Android Data Recovery" on its primary interface.
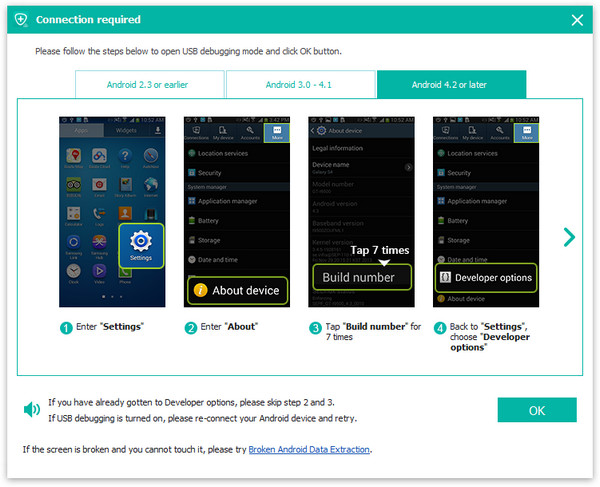
Step 2. Use a USB cable to connect your Samsung Galaxy S20 FE/S20 FE Lite/S20/S20+/S20 Ultra to computer, then follow the on-screen prompts to enable the USB debugging on your phone screen and establish a connection between your phone and computer. If done, tap "OK".
Step 3. Now, you will be asked to choose the file types to restore, and tap "Next" to begin to analyze your phone and scan your phone under the standard scan mode. If you want to get more data, you can directly tap "Deep Scan" in the pop up dialog.

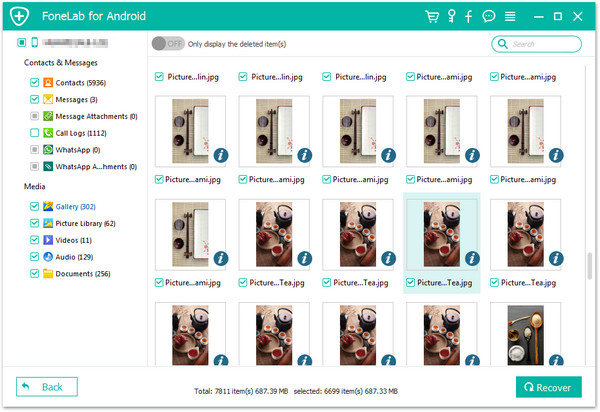
Step 4. Wait for the scan to complete, all the scannning result will be displayed by categories, you can click to preview them one by one in detail, after confirming the files you need, click on "Recover" to save the selected files to your computer.
Extract Data from Backup and Restore to Samsung Galaxy S20 FE/S20 FE Lite/S20/S20+/S20 Ultra
Samsung Data Recovery also allows you to back up and restore your phone data, if you have ever backed up your phone data with this software, then you can easily restore data from the backup file your Samsung Galaxy S20 FE/S20 FE Lite/S20/S20+/S20 Ultra.
Step 1. Return to the homepage of the software, then click on "Android Data Backup & Restore" and connect your Samsung Galaxy S20 FE/S20 FE Lite/S20/S20+/S20 Ultra to computer with its USB cable.
Step 2. Once your phone is detected, choose a restore mode on the page, either "Device Data Restore" or "One-click Restore". If you want to restore data from backup selectively, we recommend you to choose the "Device Data Restore" option.

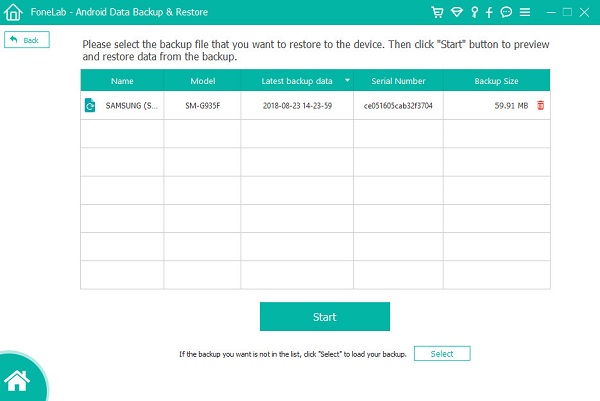
Step 3. After choosing the backup file you need, tap on "Start" to begin extracting all the data that can be restored from the selected backup file.
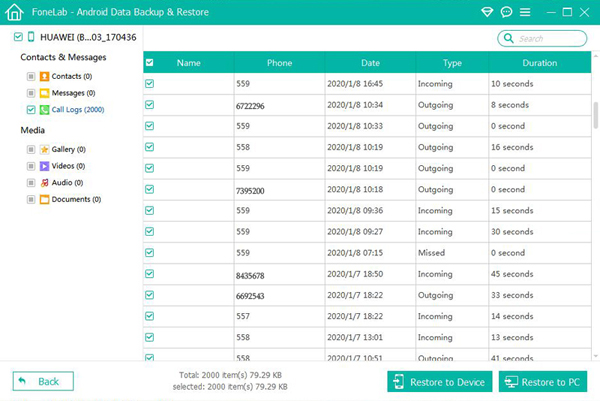
After that, select the files you need, then click on "Restore to Device" to sync them to your Samsung Galaxy S20 FE/S20 FE Lite/S20/S20+/S20 Ultra, or click on "Restore to PC" to save them back to your computer.
Recover Data on Samsung Galaxy S20 FE/S20 FE Lite/S20/S20+/S20 Ultra with Best Data Recovery
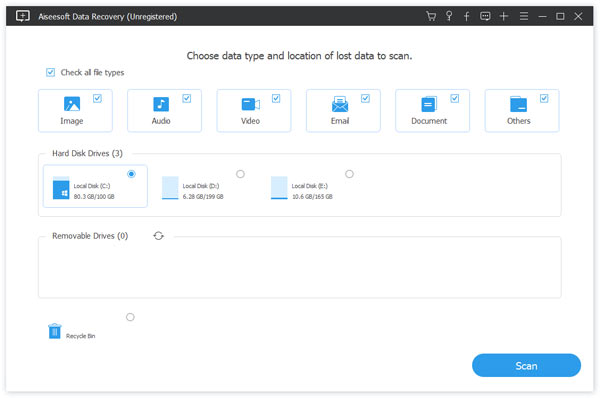
Best Data Recovery is another popular and reliable yet professional data recovery software that can help directly restoring photos, videos, audio, documents, email and more from mobile phone, computer, hard drive, flash drive, memory card, digital camera, etc. So, with the help of this software, you can easily restore data from your Samsung Galaxy S20 FE/S20 FE Lite/S20/S20+/S20 Ultra without backup.
Step 1. Run the software on your computer after downloading and installing, then connect your phone to computer using its USB cable.
Step 2. Once your phone is detected, select the file types and your phone's disk name on the homepage, and click on "Scan" to begin scanning your phone for the lost data under the Quick Scan mode.
Step 3. After scanning, you can see all the scan result, you can click to preview all of them one after another, or use the "Filter" feature to quickly locate the files you want to recover. If you can't find your missing data, you can click "Deep Scan" to try again.
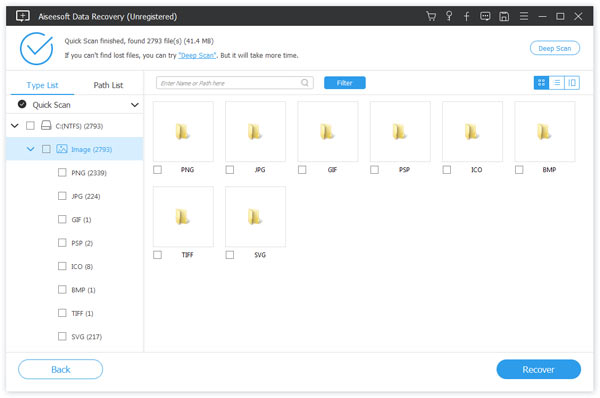
After confirming the files you need, click on "Recover" to save them back to your computer.
Countless experience tells us that no matter how busy we are, regularly backing up our mobile phone data will definitely help us in some emergency. So next we will share some simple methods to help you back up your Samsung Galaxy S20 FE/S20 FE Lite/S20/S20+/S20 Ultra data easily.
Part 3 Back Up on Samsung Galaxy S20 FE/S20 FE Lite/S20/S20+/S20 Ultra
Back Up Samsung Galaxy S20 FE/S20 FE Lite/S20/S20+/S20 Ultra to Samsung Cloud
Manual back up
- Step 1. Unlock your phone, go to "Settings", then choose your phone name, and tap on "Back up data". If this is the first time to back up your phone data, you may need to tap "No backups" instead.
- Step 2. Then click on "Back up data" again to go on.
- Step 3. After choosing the data you want to back up, tap on "Back up" to begin backing up your phone data.
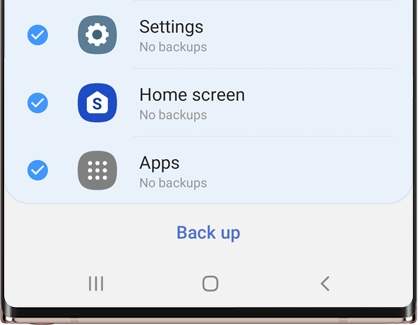
Please wait patiently until all data is backed up, the time required for the backup depends on the amount of data you need to back up. If done, press "Done" when it's finished syncing.
Automatic back up
Your phone data will be backed up automatically once every 24 hours, and you are allowed to customize what files you want to back up. But the following conditions need to be met:
- Your phone needs to be charging.
- Your phone needs to be connected to a Wi-Fi network.
- The screen of your phone needs to be off for at least an hour.
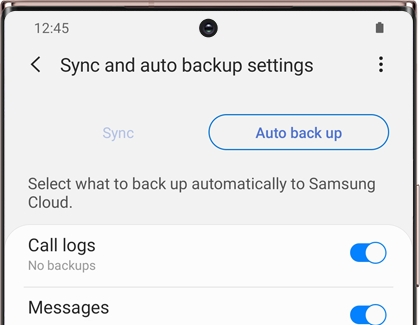
- Step 1. Unlock your phone, go to "Settings", then choose your phone name, and tap on "Back up data".
- Step 2. Tap on "More options" (the three vertical dots) > "Settings".
- Step 3. Then press "Sync and auto backup settings", and click on "Auto back up".
- Step 4. Now, please press the switch buttons near to the opitons that you need to back up automatically.
Back Up Samsung Galaxy S20 FE/S20 FE Lite/S20/S20+/S20 Ultra with Samsung Kies
Step 1. Run Samsung Kies and connect your Samsung Galaxy S20 FE/S20 FE Lite/S20/S20+/S20 Ultra to computer via a USB cable.
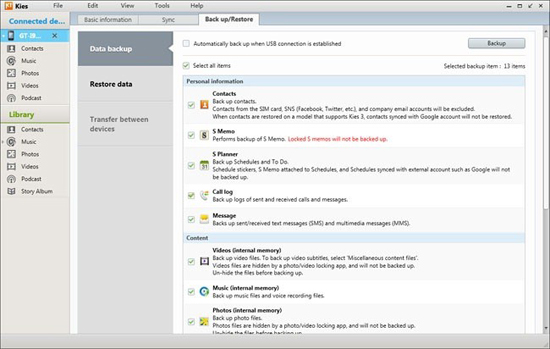
Step 2. After your phone is detected by the program, tap on the "Back up/Restore" option on the main menu of the page.
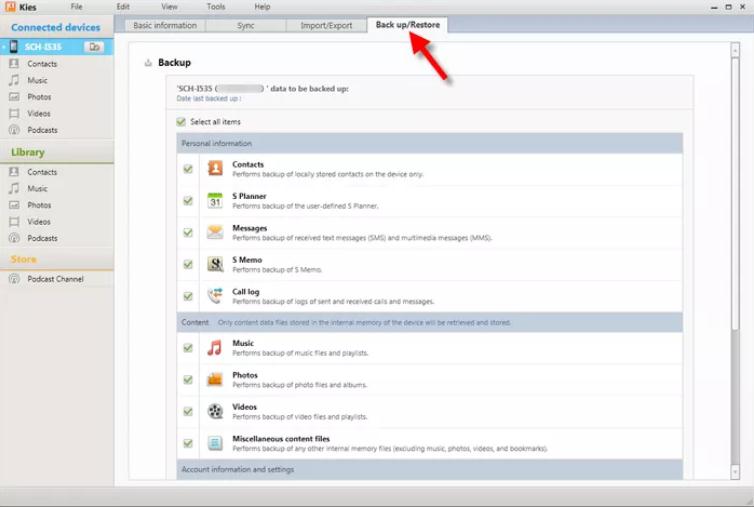
Step 3. Select the items you want to back up, and then click on the "Backup" button to begin backing up your phone data. Wait for the backup to complete, then press "Complete".
Back Up Samsung Galaxy S20 FE/S20 FE Lite/S20/S20+/S20 Ultra with Mobile Transfer
Step 1. Run Mobile Transfer, then click on "Back Up Your Phone".
Step 2. Connect your Samsung Galaxy S20 FE/S20 FE Lite/S20/S20+/S20 Ultra to computer by using a USB cable, and select the save path for your backup file.
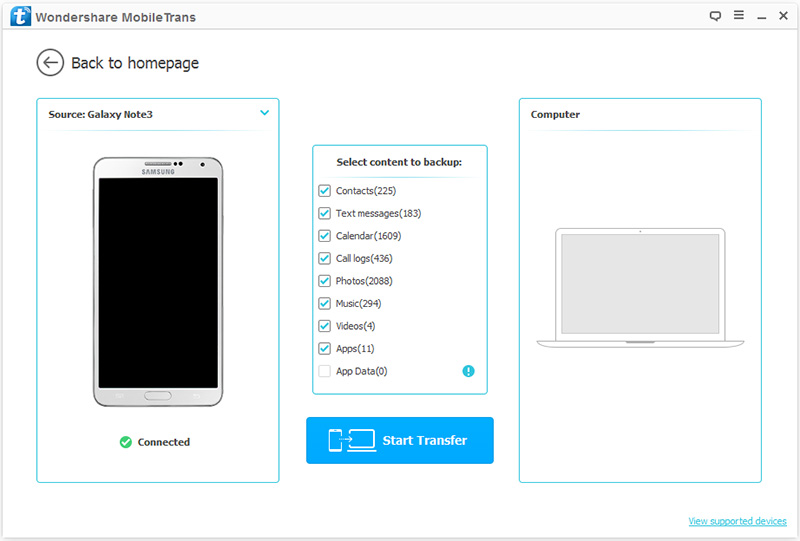
Step 3. Once your phone is detected, choose the file types you would like to back up, and click on "Start Transfer" to begin backing up your phone data.
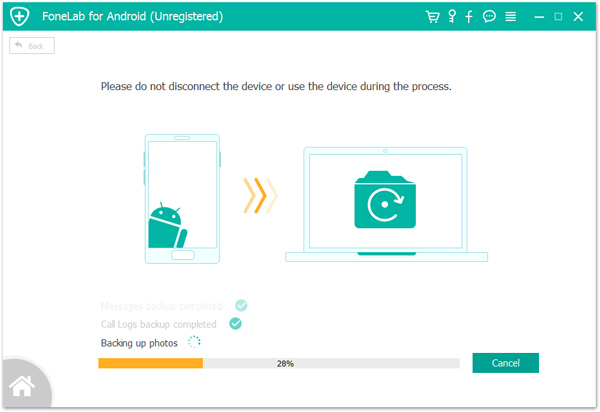
Back Up Samsung Galaxy S20 FE/S20 FE Lite/S20/S20+/S20 Ultra with Android Data Backup & Restore
Step 1. Run Samsung Data Recovery, then click on "Android Data Backup & Restore" and connect your phone to computer.
Step 2. Choose a backup option on the page, either "Device Data Backup" or "One-click Backup".
Step 3. Select the file you need, then tap on "Start" to begin backing up your phone data.