Overview: If you still don't know how to efficiently complete the data transfer of Sony Xperia Pro-I and safely restore the lost or deleted data in Sony Xperia Pro-I, this guide brings you the perfect solutions.
Sony Xperia PRO-I is a mobile phone product designed specifically for content creators and video lovers. It uses the Alpha Mirrorless TM series of shooting technology, and for the first time is equipped with a 1-inch image sensor and phase detection autofocus function, which can realize eye autofocus and object tracking in video shooting. Its rear cameras are 16mm, 24 mm and 50 mm lenses and a 3D iToF sensor. The 24mm lens also uses Tessar Optics T* provided by Zeiss to achieve high-resolution images, reduce edge image distortion, and achieve Higher contrast and sharpness. Not only that, its Xperia Pro-I also uses a 1-inch sensor equipped with the Xperia PRO-I, which is an image sensor based on the Sony Black Card RX100 VII, and has also been optimized for mobile phone adaptation, with phase detection AF Function. In the core configuration, it is equipped with Qualcomm Snapdragon 888 processor, built-in 4500mAh battery, memory is 12GB RAM + 512GB ROM, and supports up to 1TB micro SDXC media.
- Part 1. Directly Transfer Data from Android to Sony Xperia Pro-I
- Part 2. Sync Data from Backup Files to Sony Xperia Pro-I
- Part 3. Directly Recover Data on Sony Xperia Pro-I without Backup
- Part 4. Restore Data from Backup to Sony Xperia Pro-I
I have to marvel at the shooting configuration of Xperia Pro-I. I believe you also will be attracted by its shooting configuration. It is no exaggeration to say that Xperia Pro-I can be called an excellent camera. When we get the excellent Xperia Pro-I, we definitely need to transfer important data from the old phone to the new phone. Below I will introduce you two methods to complete the data transmission of Xperia Pro-I so that you can better use Xperia Pro-I.
Mobile Transfer is a very good data transfer software. It is very satisfying to users in many ways. First of all, the page of this software is simple and clean, with no redundant ads. You will not worry about clicking on redundant ads and jumping to other external links. Second, its operation is very simple. You only need to follow the prompted steps to complete the data transfer of Xperia Pro-I with one click. With the help of Mobile Transfer, you can not only directly transfer data from Android to Xperia Pro-I,but also select the data in the backup to synchronize it to Xperia Pro-I. Third, the transfer process of Mobile Transfer is 100% risk-free. You can rest assured to use it to complete your data transmission. It is worth mentioning that Mobile Transfer is very efficient. It will help you complete the data transfer of Xperia Pro-I at the fastest speed.


- Supported files: Contacts (email/home address, company name, position, etc.), SMS (text messages, message attachments), call history, photos, music (playlist, album information, lyrics, artist introduction, etc.), videos, Apps, App data, calendar, reminder, note, documents, etc.
- Supported brands: Sony, Huawei, Honor, Samsung, HTC, LG, Motorola, OPPO, vivo, Xiaomi, OnePlus, Realme, Redmi, ZTE, Motolora, and so on.
Part 1. Directly Transfer Data from Android to Sony Xperia Pro-I
Step 1: Select the transfer mode
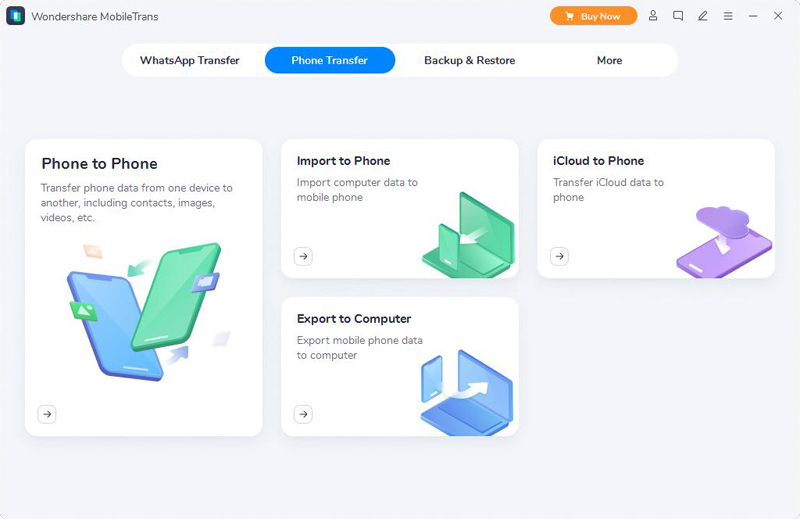
Select the appropriate version of Mobile Transfer (WIN/MAC) to download it to your computer, and run it after installation. Then select the "Phone To Phone Transfer" mode on the main page. "Phone To Phone Transfer" mode allows you to directly transfer data from your old phone to Xperia Pro-I.
Step 2: Connect the device to the computer
Use USB to connect the old Android device and the new Xperia Pro-I to the computer. Then check the display after Source and Destination.
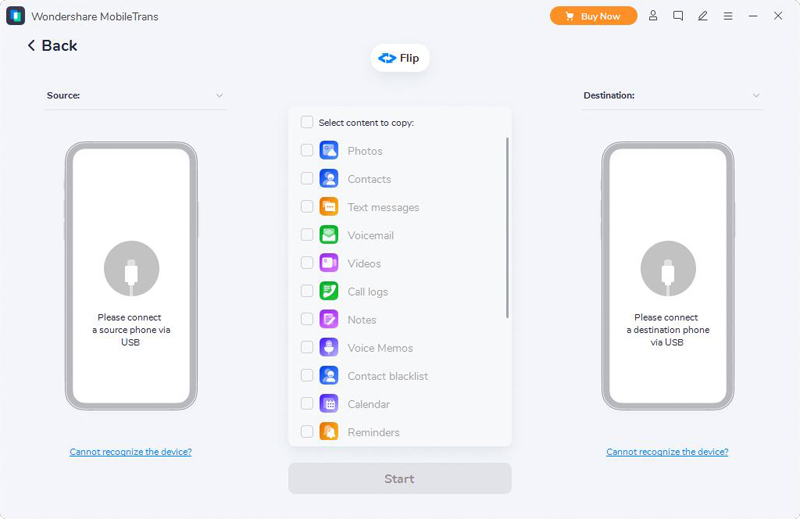
Tip: Source-the old Android device, Destination-Xperia Pro-I. If you find that the order displayed on the page is incorrect, please click the "Flip" button to swap the positions of the two phones.
Step 3: Transfer data with one-click
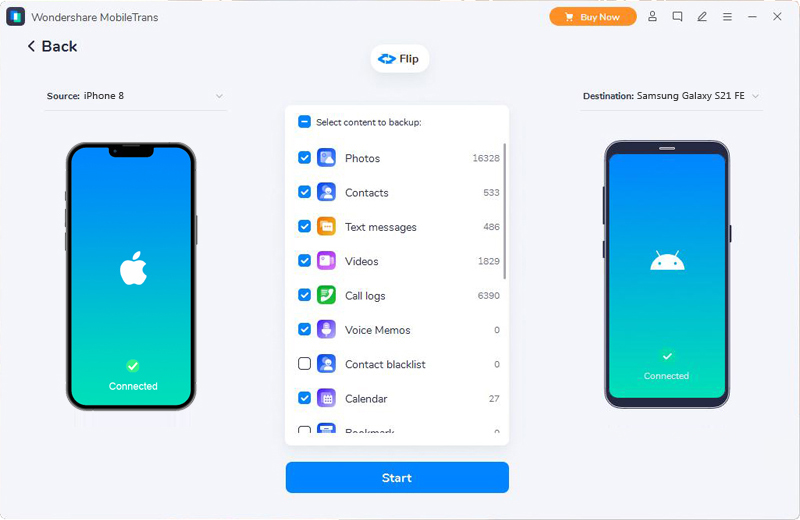
After detecting your device, Mobile Transfer will list all the data that can be transferred on the interface. Select the data to be transferred to Xperia Pro-I, and then click "Start Transfer" to start the data transfer.
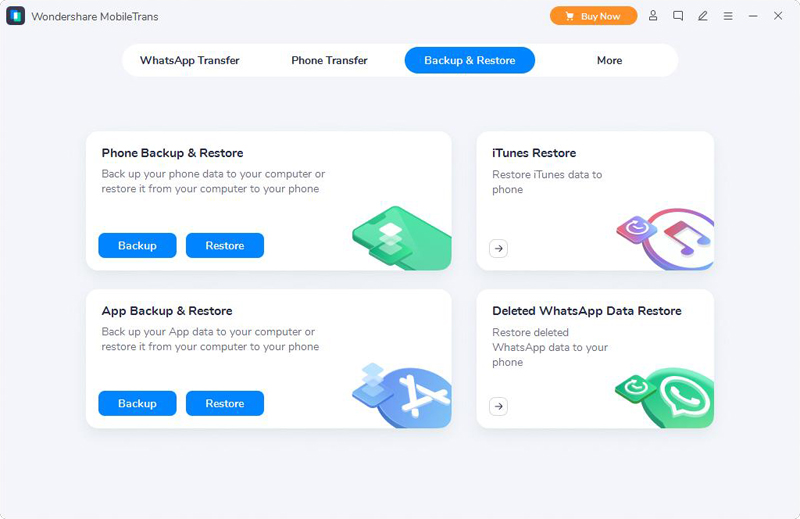
Part 2. Sync Data from Backup Files to Sony Xperia Pro-I
Step 1: Run Mobile Transfer on the computer. After entering the main page of the software, select the "Restore From Backups" mode and select MobileTrans or other backups according to your needs.
Tip: If you have not downloaded Mobile Transfer, you need to download Mobile Transfer before you can complete the following operations.
Step 2: Use a USB cable to connect Xperia Pro-I to the computer. After the software detects your device, you can proceed to the next step.
![]()
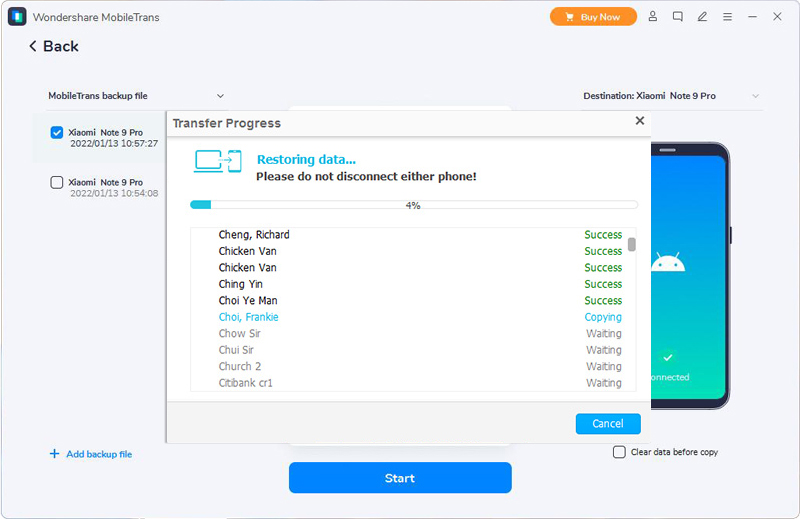
Step 3: You can see a list of backups on the page. Please select a desired backup file from the backup list. After selecting, click "Start Transfer" to synchronize the data in the "MobileTrans" backup file to Xperia Pro-I.
After you use Xperia Pro-I for a while, you will definitely use it to store a lot of important data and a lot of wonderful photos. If one day the data in Xperia Pro-I is lost for some reason, how should you recover the important data in Xperia Pro-I? If you have the habit of backing up regularly, you can directly restore the files in the backup to Xperia Pro-I. If you don't have a backup file, can you still retrieve the lost data? Don’t worry, I have prepare some solutions for you. These are two ways to help you recover lost and deleted data in Xperia Pro-I. Regardless of whether the lost data has a backup file or not, you can use the following two methods to restore the data in Xperia Pro-I.
Sony Data Recovery is a data recovery software for everyone. It is simple to operate, efficient in recovery and so on. It can help you restore data lost or deleted due to restoring factory settings, flashing ROM, rooting, accidental deletion and other reasons. It supports many types of data to be recovered, including pictures, text messages, contacts, call logs, WhatsApp chat logs, videos, audios, and documents. It can be compatible with many devices, including most smartphones on the market such as Xperia Pro-I. It is worth mentioning that it also has a free version. You can download the free version or the official version according to your needs. It should be noted that the only data that can be recovered in the free version is contacts and call history.
Part 3. Directly Recover Data on Sony Xperia Pro-I without Backup
If your lost data is not backed up, you can choose this method. This method can help recover your lost or deleted data safely and quickly without backup.
Step 1: Download Sony Data Recovery
According to the system of your computer , select the appropriate version of Sony Data Recovery to download to the computer, and then follow the prompts to complete the installation and run it.
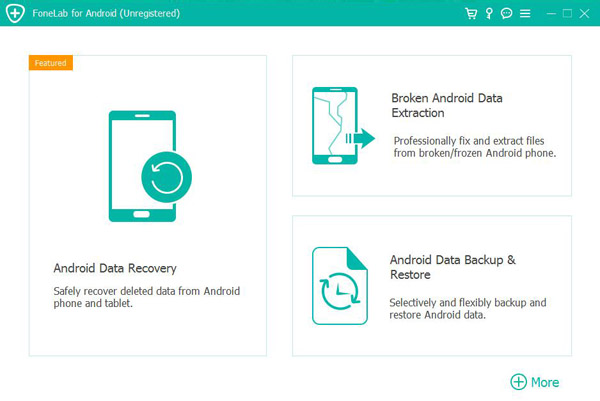
Step 2: Choose a recovery mode
Select the "Android Data Recovery" mode on the main page of the software, and then connect your Xperia Pro-I to the computer via USB cable.
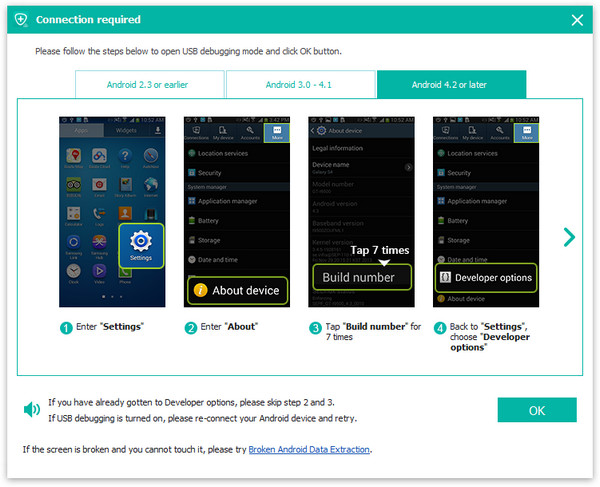
Step 3: Perform USB debugging
In order to better help you recover lost or deleted data on Xperia Pro-I, you need to enable USB debugging on Xperia Pro-I. The specific steps are as follows:
- Find Settings on the Xperia Pro-I.
- Find Build Number and tap it for 7 times continuously.
- Go back to Settings and click Developer Options.
- Check USB Debugging Mode.
Tips: If you still don't know how to operate, you can follow the instructions of Sony Data Recovery to complete the USB debugging of the device.
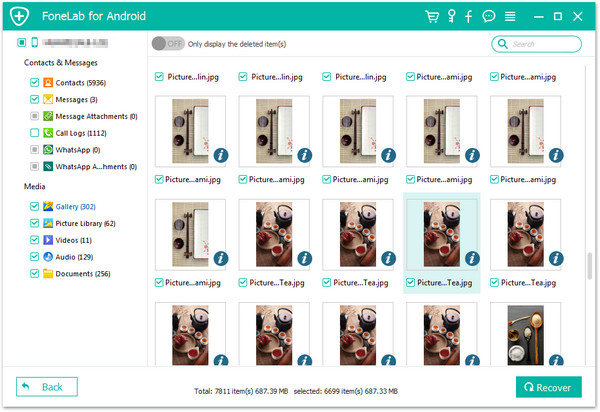
Step 4: Preview and recover data
You can view all the data that can be recovered on the software's page. Select the data you need to recover, and then click "Next" to scan.

After scanning, you can view all recoverable data specific items on the software's page. Select the data you need to restore to Xperia Pro-I on the page. After selecting, click "Recover" to start recovering your data.
Tip: If you can't find the data you want, click "Deep Scan" button on the right bottom corner to get more lost data.
Part 4. Restore Data from Backup to Sony Xperia Pro-I
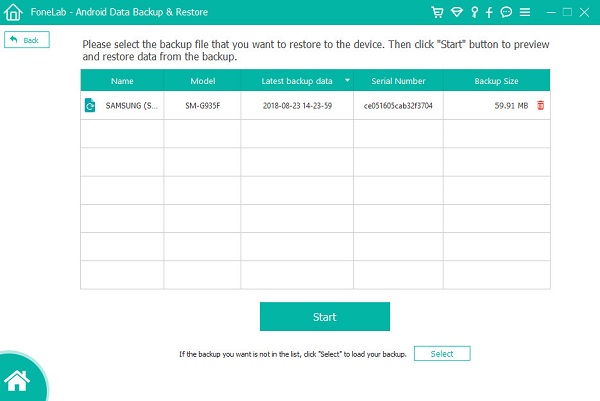
Step 1: Run Sony Data Recovery on the computer, and then select the "Android Data Backup & Restore" mode on the page.
Step 2: Use a USB cable to connect your Sony Xperia Pro-I to the computer.
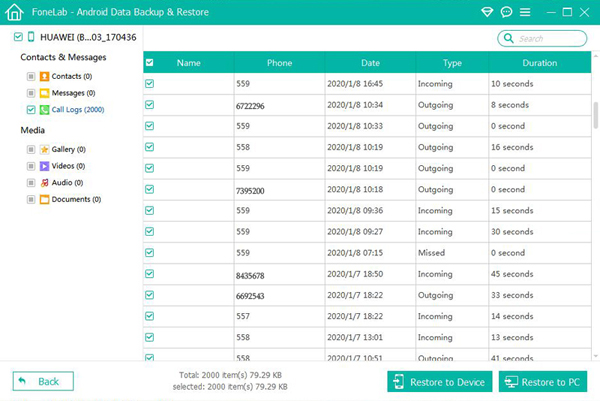
Step 3: On the page, select the "Device Data Restore" or "One-click Restore" mode .

Step 4: Now you can view all your backup files on the page. Please select the desired backup file from the backup list displayed on the page. After selecting, click the "Start" button to extract the recoverable data from the backup.
Step 5: Select the files that need to be restored to Sony Xperia Pro-I from the extracted data. After selecting, click "Restore to Device" to restore the data in the backup to your Xperia Pro-I.