Overview: We always want Screen Record our Gameplay moment in order to share it with others. But How to Screen Record Gameplay on PS4? Don’t worry and here is the place! This article will solve your questions and provide you with a variety of ways to Screen Record Gameplay on PS4.
Some features about PS4:
PlayStation 4 use AMD - based x86-64 architecture processors, different from PlayStation?3 using CELL architecture. PS4 host is about ten times as capable as PS3 host, Game screen to further enhance the resolution P.1080 Comparative PS3, PS4 add a lot of features, Such as cross-game voice chat function, transformed into a real friend of the network and through the Ustream and Twitch network streaming live broadcast play screen.
This guide is divided into two parts. The first part is mainly to help you solve the problem of how to Screen Record Gameplay on PS4. and the second part I will introduce you to three screen recording software. Of course, you can also use them to try the Screen Record Gameplay on PS4.
Method outline:
Part 1: Simple steps of Screen Record Gameplay on PS4.
Method 1:Using Built-in Capture Feature to Screen Record Gameplay on PS4.
Method 2:Using Screen Recorder to Screen Record Gameplay on PS4.
Part 2:other common ways of Screen Record Gameplay.
Method 3: Screencast-O-Matic
Method 4: Camtasia
Method 5: Ezvid
Part 1: Simple steps of Screen Record Gameplay on PS4.
Here l will show you how to use simple steps to Screen Record Gameplay on PS4.
Method 1:Using Built-in Capture Feature to Screen Record Gameplay on PS4.
This method uses the PS4 built-in recording function. So its advantages are obvious. You don't need to install a third-party tool to record your game screen, but you need to note that using this method to capture time for up to 30 fps per hour.
Step 1:Open your PS4 as usual , and open the game.
When you play with a particular scene or achievement you want to record, you intend to record it.
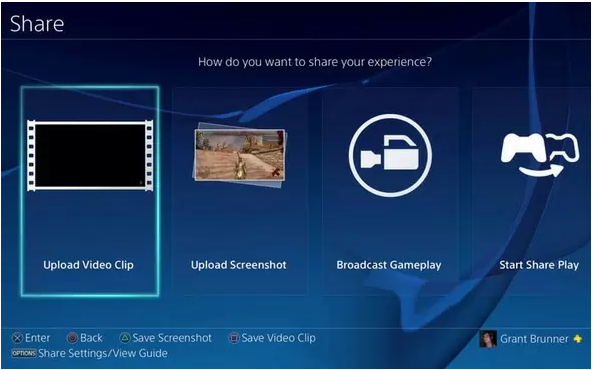
Step 2: Then, start recording. You just click the share button twice. An animation will appear on the upper left side of the screen, indicating that it has started recording.
Step 3:When you want to stop recording, long press the "share" button, the record will stop automatically.
Step 4: Save your video file and click "Save Video Clip ". (You can also consider buying a u disk to save your recorded video).
Method 2:Using Screen Recorder to Screen Record Gameplay on PS4.
Screen Record is a professional video recording software, It is very safe and efficient. You can Use it to record your online games including XBox, BattleGrounds, OverWatch, World Of WarCraft, LOL and more on computer. It Allows you to capture video, audio, online tutorial, etc.
The excellent features of it including capture videos with full screen or customized size with high quality according to your need, record favorite voice or song on the computer and then save them to wherever you want, select certain snapshots no matter one or more from tutorials, movies, TV shows and more.


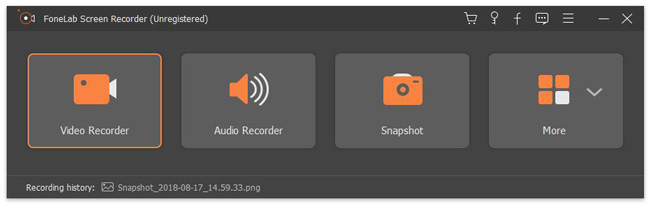
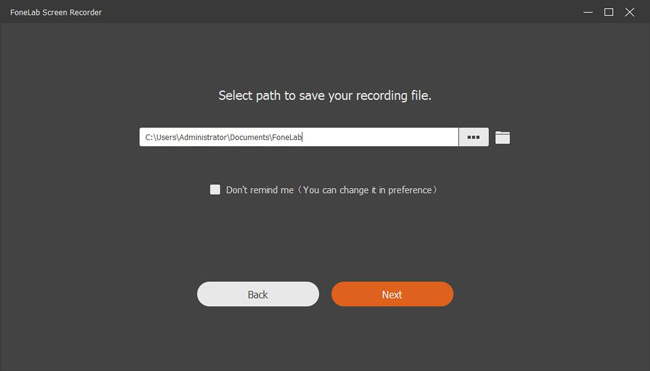
Step 1: Download and install the software on your computer.
Step 2: Run on your PS4 as usual , and open the game.
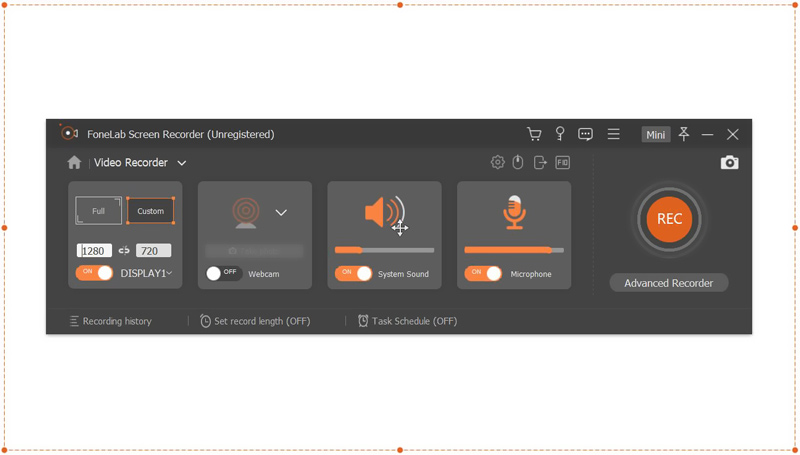
Step 3: Choose “Video Recorder”, click “Full or Custom” to select recording area.
Step 4: Enable or disable Webcam, System Sound and Microphone accordingly. Click “REC” button.
Step 5: Click “stop” icon on the taskbar when it is done. Of course, you can choose to save it to your computer.
Part 2:other common ways of Screen Record Gameplay on PS4.
Here l will introduce some useful ways about Screen Record Gameplay. Please be aware that some software is completely free, for example Ezvid. In order to have a better experience and more efficient recording of your screen, some need to pay.
Method 3: Screencast-O-Matic
Screencast-O-Matic have two versions for you to choose from, the paid version and the free version. Obviously paid versions have a better use experience.
Important features:
1.Add music, animation, video information graphics are allowed.
2.Be able to keep your recording and online backup safe.
3.Screen recorder likes screen capture and other functions are free.
4.A paid version can uploads files to Google Drive,Dropbox,Vimeo.
5.During the recording process, you can zoom in, shrink, and add text at will.
6.More affordable.
Advantages:
1.Paid version removes watermark.
2.No time limit for recording.
3.Users can edit tracks.
Disadvantages:
1.Free version can not remove watermark.
2.Free version only allow 15 minutes recording.
Method 4: Camtasia
As far as we know, Camtasia is not a free software. But you can get a 30-day refund guarantee and a free trial before the formal payment. And this allows you to experience some of the Camtasia's features before deciding whether to buy.
Advantages:
1.There is no time limit for video length.
2.Mac and Windows are compatible.
3.30-day refund guarantee.
Disadvantages:
1.The function is complex and requires a lot of training to use it correctly and skillfully.
2.The choice of prefabricated sound themes is very limited.
Method 5: Ezvid
The good news is Ezvid is completely free for users.
Main features:
1.It has an efficient built-in editor.
2.There is no watermark in recording or editing video.
3.The resolution of uploading video to YouTube is 1280×720, and the operation is simple.
4.The animation effect is automatic.
Advantages:
1.Video can be uploaded directly to YouTube.
2.No registration fee
Disadvantages:
1.It is not always compatible with Mac.
2.Hidden record are not available.
3.Video is not allowed to be saved on the computer.
4.Music can not appear on the timeline.