Overview: Are you still looking for a way to efficiently complete data transfer and data recovery? In this guide, I have prepared a variety of safe and efficient methods for you to complete the data transfer and data recovery of vivo X70/X70 Pro/X70 Pro+.
The vivo X70 series has three products, namely vivo X70, vivo X70 Pro and vivo X70 Pro+. The configuration of these three products is very good, now I will briefly introduce them to you.
In terms of screens, the vivo X70 and X70 Pro use a 6.56-inch AMOLED screen with a resolution of 2376X1080, support 120Hz refresh rate, and a centered perforated screen; X70 Pro+ uses a 6.78-inch 2K·E5 super-sensing free screen and supports MicroLens Lithography technology and LTPO free frame rate of 1-120Hz. On the processor, the vivo X70 uses the MediaTek Dimensity 1200 processor, the X70 Pro uses the Samsung E1080 processor, and the X70 Pro+ uses the Qualcomm Snapdragon 888 Plus processor. In terms of image configuration, both X70 Pro and X70 Pro+ are equipped with vivo's V1 image chip. Among them, X70 Pro+ uses a dual main camera configuration of 48MP pixel micro-head main camera + 50MP outsole main camera + 12MP portrait + 8MP periscope camera; X70 Pro uses 50MP outsole micro-head main camera + 12MP portrait +8MP periscope camera configuration; X70 is a 40MP outsole micro-pan head main camera +12MP portrait +12MP wide-angle camera configuration. In terms of battery life, X70 uses a 4400mAh battery that supports 44W flash charging; X70 Pro uses a 4450mAh battery that supports 44W flash charging; X70 Pro+ uses a 4500mAh battery that supports 55W flash charging and 50W wireless flash charging.
- Part 1 Restore Data from vivoCloud to vivo X70/X70 Pro/X70 Pro+
- Part 2 Sync Data from Android to vivo X70/X70 Pro/X70 Pro+
- Part 3 Sync Data from iPhone to vivo X70/X70 Pro/X70 Pro+
- Part 4 Directly Recover Data on vivo X70/X70 Pro/X70 Pro+ without Backup
- Part 5 Restore Files from Backup to vivo X70/X70 Pro/X70 Pro+
- Part 6 Retrieve Files to vivo X70/X70 Pro/X70 Pro+ with Best Data Recovery
The three products of the vivo X70 series are very attractive to customers. I believe its excellent configuration also attracts you. When you have the vivo X70/X70 Pro/X70 Pro+, I think you can't wait to use it. To better use the new phone, we need to synchronize the data in the old phone or backup to the new phone. Therefore, I will introduce you a variety of methods to help you complete the data transmission of vivo X70/X70 Pro/X70 Pro+ so that you can better use it.
Part 1 Restore Data from vivoCloud to vivo X70/X70 Pro/X70 Pro+
If the data you want to transfer has been backed up to vivoCloud, you can choose this method to synchronize the data in vivoCloud to vivo X70/X70 Pro/X70 Pro+.
Step 1: Connect your device to a stable Wi-Fi network. Find and open the vivoCloud application on vivo X70/X70 Pro/X70 Pro+.
Step 2: Log in to your vivo account on this page.
Step 3: After logging in successfully, your backup file will be displayed on the page. The backup files and data types that are needed now. After selecting, click "Restore" to restore the data in the backup to vivo X70/X70 Pro/X70 Pro+.
Part 2 Sync Data from Android to vivo X70/X70 Pro/X70 Pro+
If you used an Android phone before purchasing vivo X70/X70 Pro/X70 Pro+, and you want to synchronize the data from the Android phone to the new vivo phone, you can choose the method prepared for you in this section. In this part, I have prepared two methods for you to help you synchronize data from Android to vivo X70/X70 Pro/X70 Pro+. To use these two methods, you need the help of Mobile Transfer.
Mobile Transfer is a very good data transfer software. It can not only help you complete data transfer directly between the two devices, but also help you restore the data in the backup to the device you need. With its help, you only need to connect two devices to the computer and a few clicks to complete the data transfer. In terms of device compatibility, Mobile Transfer is compatible with almost all brands of devices on the market. In addition, the data transferred by Mobile Transfer is very comprehensive and rich. You can easily complete the transmission of the required data with its help, thereby saving you a lot of time.


Supported devices include: vivo, Samsung, HTC, LG, Sony, Google, Xiaomi, Redmi, Realme, OPPO, Huawei, Motorola, ZTE, All versions of iPhone, iPad, iPod Touch, etc.
Supported files: Contacts (email/home address, company name, position, etc.), text messages, call logs, photos, music (playlists, album information, lyrics, artist introductions, etc.), videos, applications, App data, documents, calendars, notes, etc.
Method 1: Directly Transfer Data from Android to vivo X70/X70 Pro/X70 Pro+
This method will introduce you how to directly transfer data from Android to vivo X70/X70 Pro/X70 Pro+. Therefore, to use this method, you need to prepare your computer, two USB cables, and Mobile Transfer.
Step 1: Choose the appropriate Mobile Transfer version according to your computer's system, download and install it to your computer.
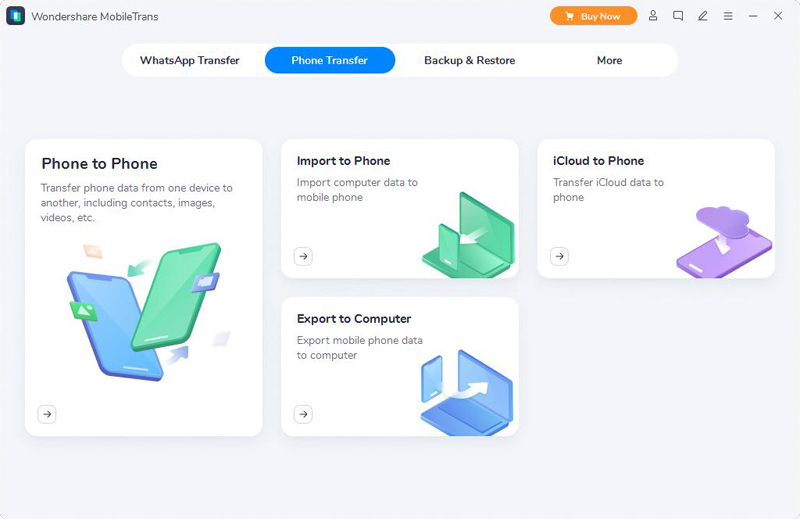
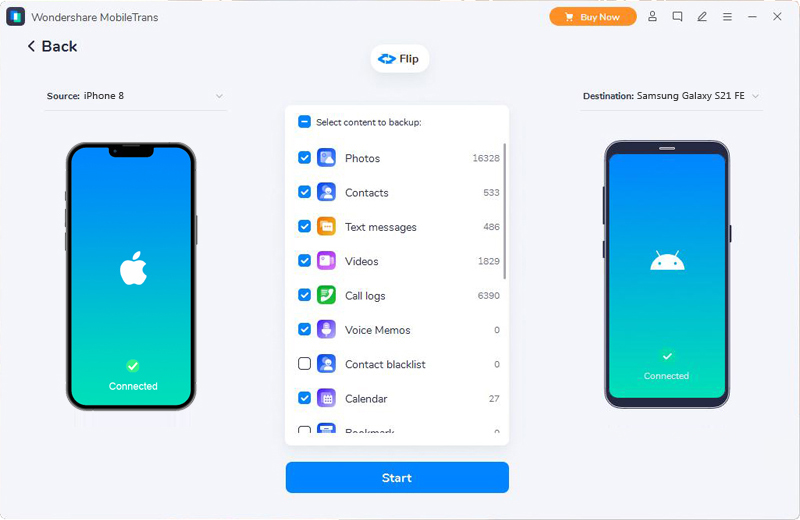
Step 2: Start Mobile Transfer and select "Phone to Phone Transfer" mode on the main page. Then use the USB cables to connect your Android phone and vivo X70/X70 Pro/X70 Pro+ to the computer.
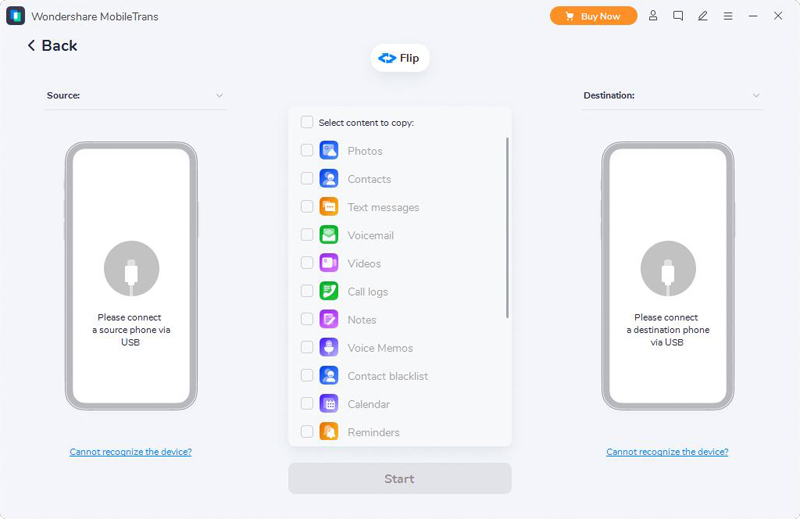
Step 3: Select the data to be synchronized on the page, and then click "Start Transfer" to synchronize the selected data from Android to vivo X70/X70 Pro/X70 Pro+.
Method 2: Sync Data from Backup to vivo X70/X70 Pro/X70 Pro+
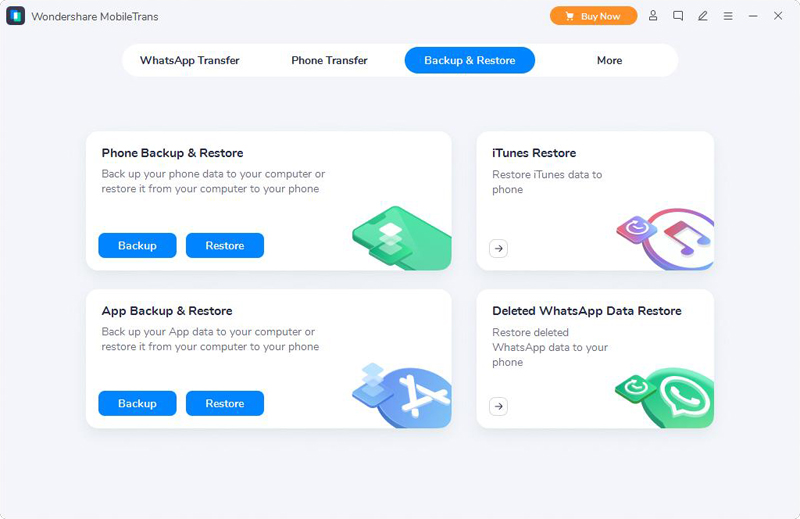
Step 1: Enable Mobile Transfer on the computer, then select "Restore from Backups" on the page and select "MobileTrans" among all the options.
Step 2: Use a USB cable to connect vivo X70/X70 Pro/X70 Pro+ to the computer. The software will automatically detect your device. After the software successfully detects your device, you can proceed to the next step.
![]()
Step 3: You will see all the backup files on the page. Select the backup file you need, and select the required data type in the middle of the page. After selecting, click "Start Transfer" to synchronize the data in the backup to vivo X70/X70 Pro/X70 Pro+.
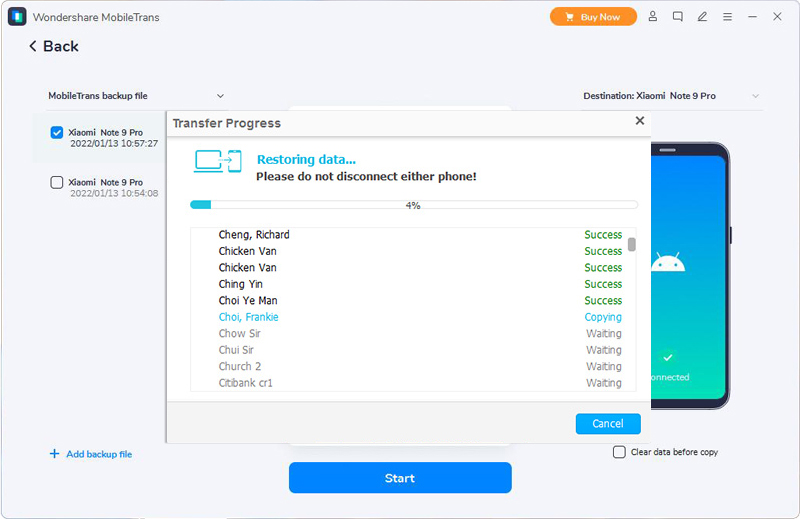
Tip: If you need to empty your destination phone before the transfer, tick off the "Clear data before copy" bar under the destination phone picture.
Part 3 Sync Data from iPhone to vivo X70/X70 Pro/X70 Pro+
Are you worried that the system of iPhone and vivo X70/X70 Pro/X70 Pro+ is different and it is difficult to complete data transfer? I will show you how to transfer data from iPhone to vivo phone in this part. Similarly, you need the help of Mobile Transfer.
Method 1: Directly Sync Data from iPhone to vivo X70/X70 Pro/X70 Pro+
Step 1: Run Mobile Transfer on the computer, and then select the "Phone To Phone Transfer" mode on the homepage of the software and press "Start".
Tip: If Mobile Transfer has not been downloaded on your computer, please download the software first before completing the following operations.
Step 2: Use a USB cable to connect your iPhone and vivo X70/X70 Pro/X70 Pro+ to the computer.
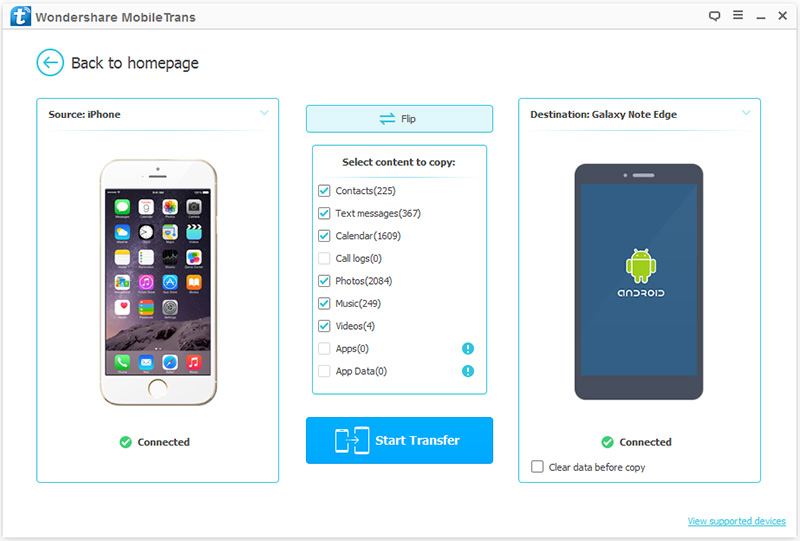
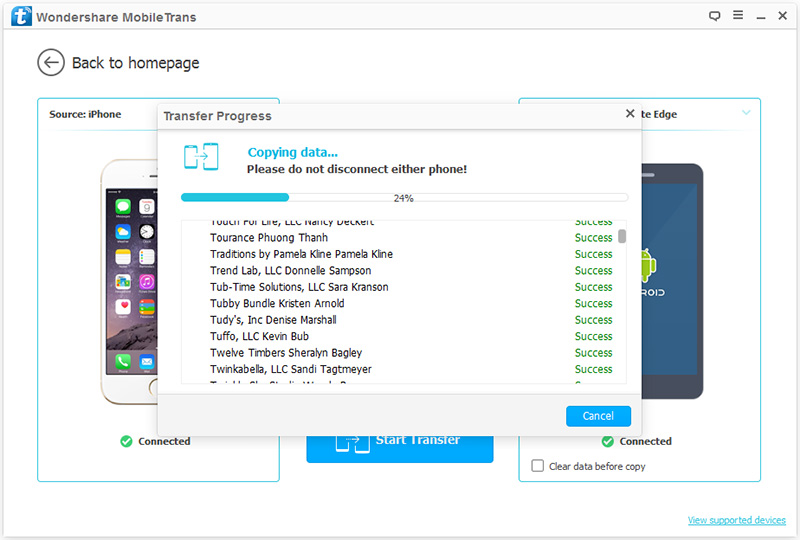
Step 3: On the page you can view all the data that can be transferred. Select the data that needs to be transferred from the iPhone to the vivo X70/X70 Pro/X70 Pro+, and then click "Start Transfer".
Method 2: Sync Data from iTunes Backup to vivo X70/X70 Pro/X70 Pro+
Step 1: Run Mobile Transfer on the computer, then select the "Restore from Backups" mode on the page and select the "iTunes" option.
Step 2: Use a USB cable to connect your vivo X70/X70 Pro/X70 Pro+ to the computer. Then Mobile Transfer will automatically detect your iTunes backup and display all the backup files on the left side of the page.
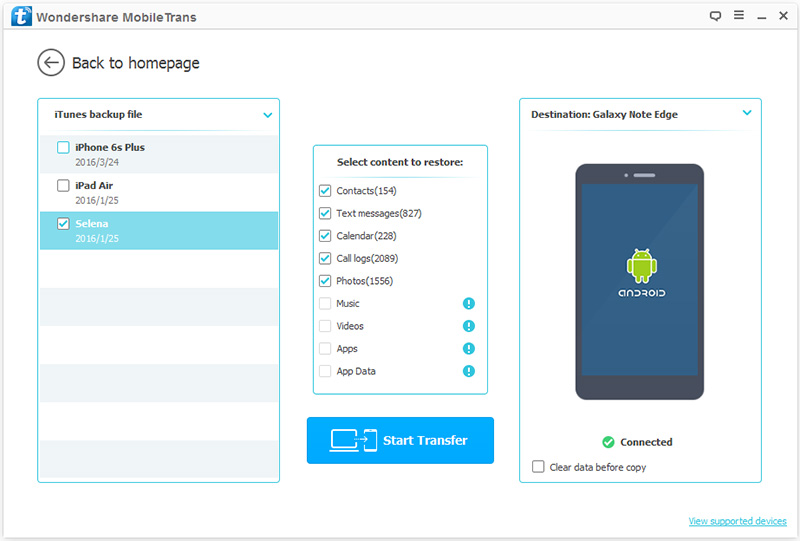
Step 3: Select the backup file you need on the left side of the page, and select the type of data you need to transfer in the middle of the page. After selecting, click "Start Transfer" to synchronize the data in the iTunes backup to vivo X70/X70 Pro/X70 Pro+.
Method 3: Sync Data from iCloud Backup to vivo X70/X70 Pro/X70 Pro+
Step 1: Run Mobile Transfer on the computer, then select the "Restore from Backups" mode on the page and select the "iCloud" option.
Step 2: Use your account password to log in to your iCloud account on the left side of the page. Then use the USB cable to connect your vivo X70/X70 Pro/X70 Pro+ to the computer.
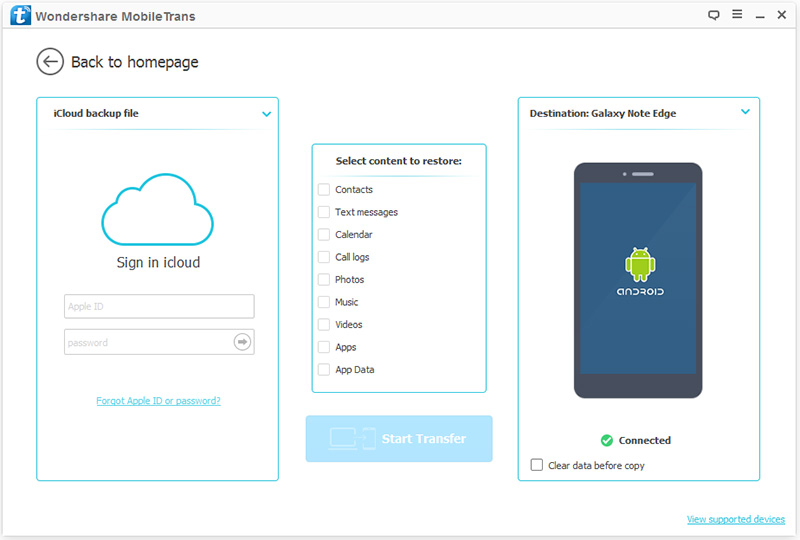
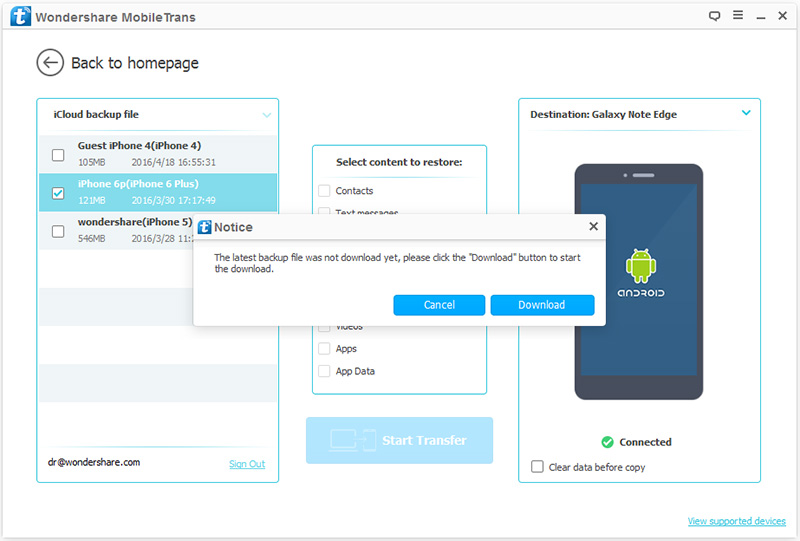
Step 3: After successfully logging in to the iCloud account, all the backup data in iCloud will be displayed on the left side of the page. Select the backup file you need, then click "Download" to to download the selected backup to your computer.
Step 4: Mobile Transfer will automatically extract all recoverable files from the downloaded backup files. Now you can select the data to be synchronized on the page. After selecting, click the "Start Transfer" button to synchronize the selected data to vivo X70/X70 Pro/X70 Pro+.
When you use the vivo X70 series, it is inevitable that data in the device will be lost due to certain circumstances. I wonder if there is a backup file for your lost data? If your lost data is stored in a backup file, it is very simple for you to retrieve the data in the device. But if your lost data is not backed up, don't worry. Below I have prepared three methods for you to help you recover lost or deleted data in vivo X70/X70 Pro/X70 Pro+. Regardless of whether your lost or deleted files are backed up, you can choose the following methods to restore the data you need.
Part 4 Directly Recover Data on vivo X70/X70 Pro/X70 Pro+ without Backup
If your lost data is not backed up, I strongly recommend you to use this method to retrieve the lost or deleted data in vivo X70/X70 Pro/X70 Pro+. Because this method can efficiently help you retrieve data that has been lost due to virus attacks, water in your phone, broken screen, accidental deletion, etc. but has not been backed up. To use this method, you need to use vivo Data Recovery.
vivo Data Recovery is a very powerful data recovery software. At present, many users have successfully recovered the lost or deleted data in the device with the help of this software. It can recover data lost in your device due to any reason, such as accidental deletion, broken screen, virus attack, mobile phone flooding, etc. In addition, the types of data that vivo Data Recovery can recover are very rich and comprehensive. Not only that, it is also used with most Android phones, including vivo X70/X70 Pro/X70 Pro+. It is worth mentioning that the software is very safe. With its help, you can restore the required data in the device with zero risk.
Supported data types: Contacts, SMS & Attachments, Call History, Gallery(Pictures/Photos/Images/etc.), Videos(such as rmvb, avi, mp4 and so on), Audio(music and sound records), Documents(Word, Excel , PPT, PDF, HTML, Zip, RAR, etc), WhatsApp Chats & Attachments, etc.
Supported brands: vivo, Huawei, Honor, Samsung, Google, OnePlus, Meizu, HTC, ZTE, LG, Sony, OPPO, Motorola, Redmi, Xiaomi, Redme, Realme, Nokia, Lenovo, etc.
Step 1: Download, install and run vivo Data Recovery. After opening the software, select the "Android Data Recovery" mode on the homepage.
Tip: The software has a free version and an official version. You can choose the appropriate version according to your needs and download it to your computer.
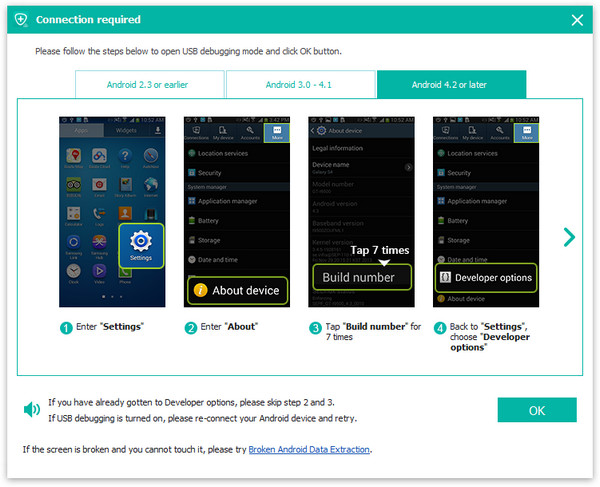
Step 2: Use a USB cable to connect vivo X70/X70 Pro/X70 Pro+ to the computer. Then complete the USB debugging on your device according to the following operations: Enter "Settings" > Click "About Phone" > Tap "Build number" for several times until getting a note "You are under developer mode"> Back to "Settings" > Click "Developer options" > Check "USB debugging".
Step 3: Select the file type you need to recover on the page. After selecting, click "Next" to scan.

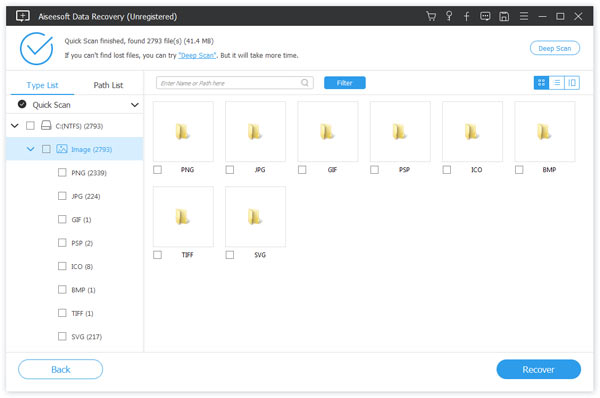
Step 4: After scanning, all recoverable data items will be listed on the page. You can preview all the data on the page. Then select the data you need to restore to vivo X70/X70 Pro/X70 Pro+. After selecting, click "Recover" to start data recovery.
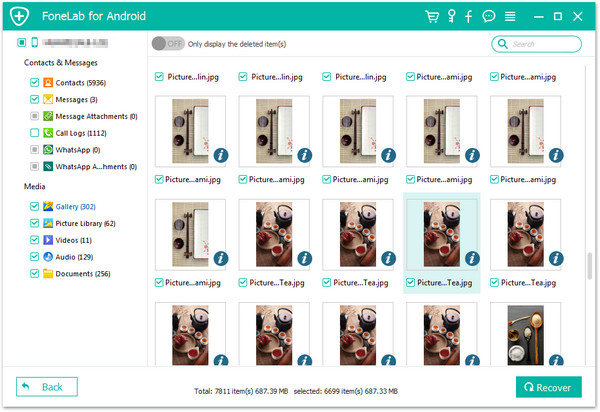
Tip: If you don’t find the data type you want on the page, click "Deep Scan" button on the right bottom corner to get more lost data.
Part 5 Restore Files from Backup to vivo X70/X70 Pro/X70 Pro+
If you want to use a simpler method, and the data you want to restore has a backup file, you can choose this method. Now I will introduce you a simpler method that is to restore the data in the backup to the vivo X70/X70 Pro/X70 Pro+.
Step 1: Launch vivo Data Recovery on the computer. After entering the main page of the software, select the "Android Data Backup & Restore" mode on the page. Then use the USB cable to connect your vivo X70/X70 Pro/X70 Pro+ to the computer.
Step 2: The software will automatically detect your device. Now you need to select "Device Data Restore" or "One-click Restore" mode on the page.

Tip: In the "Device Data Restore" mode, you can freely select any file in the backup to restore, while the "One-click Restore" mode will help you restore the data in the selected backup to your device with one click.
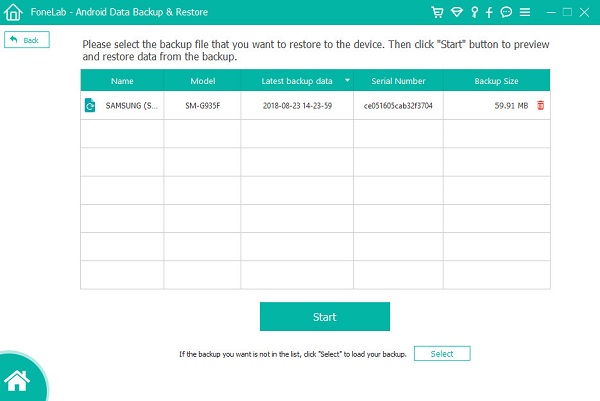
Step 3: Select the backup file you need to restore from the backup list displayed on the page, and then select the data type on the page as needed. After selecting, click "Recover" to restore the data in the backup to your vivo X70/X70 Pro/X70 Pro+.
Part 6 Retrieve Files to vivo X70/X70 Pro/X70 Pro+ with Best Data Recovery
In this part, I will show you how to quickly retrieve lost or deleted data in vivo X70/X70 Pro/X70 Pro+ with the help of Best Data Recovery. The advantage of this Best Data Recovery software is that you can retrieve all the data in vivo X70/X70 Pro/X70 Pro+ through it. And choose to save it on the computer or on the phone according to your needs. At the same time, it is very rich in compatible devices and recoverable data. In addition, this software is very safe. You can use it with confidence.
Step 1: Download, install, and run Best Data Recovery on your computer.
Step 2: Use a USB cable to connect your vivo X70/X70 Pro/X70 Pro+ to the computer.
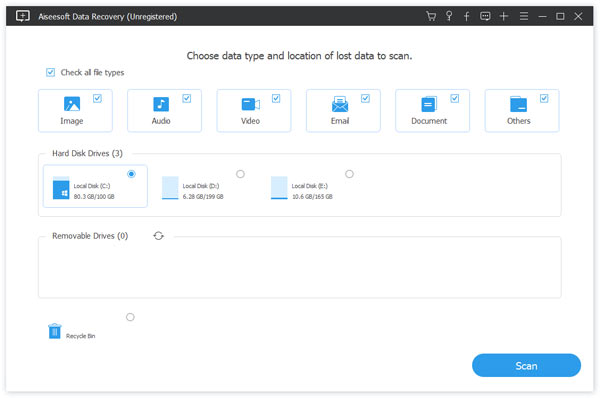
Step 3: Select the file type you need to recover on the software's page, such as images, audio, video, document, etc. Then choose the disk name of your device and click on "Scan" to begin scanning your device.
Step 4: On the page you can preview all the data scanned in the previous step. Select the data you need to recover, and then click "Recover" to recover the selected data to your vivo X70/X70 Pro/X70 Pro+.
Tip: As the same, if you can not find the files as you need, please don't worry, click on "Deep Scan" to try it again, which will scan out more files.