Overview: If your iPhone is broken or even damaged for some reason, and you cannot enter the iPhone lock screen password, how do you restore important data in your iPhone? This article introduces multiple methods to help you recover files from a Broken/Locked iPhone. At the same time, the article also introduces you how to back up data for a Broken/Locked iPhone.
"My iPhone 8 screen was accidentally broken by me, and I couldn't enter the password. This iPhone still retains a lot of important data like photos, contacts, videos and so on. How should I retrieve these important data? Please help!!" - Aaron.
"Oh! I shattered the screen of my iPhone 12. I touched the iPhone screen and there was no response. How do I export all the data in the my iPhone? Also, how do I back up the iPhone data with a broken screen?" - Peter.

There is no doubt that the iPhone is a very good product. In the process of using the iPhone, we will inevitably save a lot of important data in the iPhone. Then, if the iPhone is accidentally broken by you, how should you extract the important files in the iPhone? In this article, I introduce you various methods to help you obtain important files in Broken/Locked iPhone. In addition, in this article I also introduced you how to backup Broken/Locked iPhone. If you happen to need these methods, please read this article carefully.
- Part 1 Recover Files from Broken/Locked iPhone without Backup
- Part 2 Extract Files from iTunes Backup for Broken/Locked iPhone
- Part 3 Extract Files from iCloud Backup for Broken/Locked iPhone
- Part 4 Extract Files from Local Backup for Broken/Locked iPhone
- Part 5 Backup Data from Broken/Locked iPhone with iTunes
- Part 6 Backup Data from Broken Screen iPhone with iCloud
- Part 7 Backup Data from Broken/Locked iPhone with iOS Data Backup
- Part 8 Fix iOS System Issue for Your iPhone
First of all, I will introduce you how to retrieve data in Broken/Locked iPhone. And iPhone Data Recovery is an indispensable tool for you to use the following methods.
iPhone Data Recovery is a simple and effective data recovery software. It allows you to recover data including text messages, contacts, call history, photos, videos, notes, WhatsApp, voice memos, Safari history, and more without any hassles. With the help of iPhone Data Recovery, you only need a few simple steps The operation can restore the files in Broken/Locked iPhone. The software supports you to directly recover the data you need from iOS devices/iTunes Backup/iCloud Backup/Local Backup. At the same time, it can also help you back up your data.
Supported Devices: iPhone 13/13 Pro/13 Pro Max/13 mini, iPhone 12/12 Pro/12 Pro Max/12 mini, iPhone 11/11 Pro/11 Pro Max, iPhone XR, iPhone XS/XS Max, iPhone X , iPhone 8/8 Plus, iPhone 7/7 Plus, iPhone SE, iPhone 6S/6S Plus, iPhone 6/6 Plus, iPhone 5S/5C/5iPhone 4S/4/3GS.


Next, please click to download the iPhone Data Recovery software and install it on your computer, then follow the steps of Part 1-4 to try getting back your files inside of your broken/locked iPhone.
Part 1 Recover Files from Broken/Locked iPhone without Backup
What should you do when you accidentally break your iPhone, but you desperately need the files in the iPhone? To make matters worse, the iPhone files you need are not backed up. How do you retrieve these data? Don't worry, with the help of iPhone Data Recovery, I will show you how to directly restore files in Broken/Locked iPhone without backup.
Step 1: Choose the appropriate iPhone Data Recovery version (Win/Mac), download and install it on your computer, and then run it.
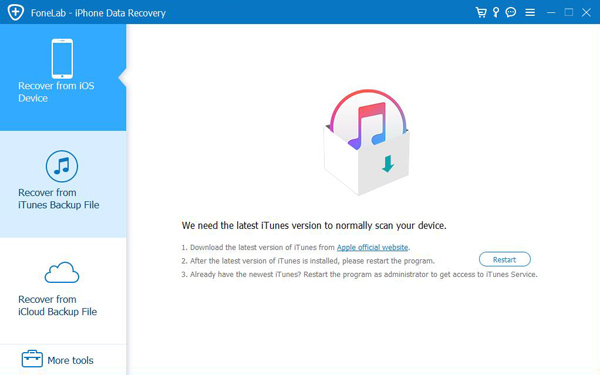
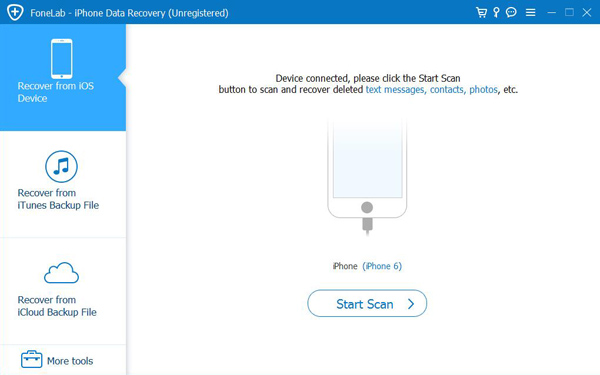
Step 2: Select "Recover from iOS Device" mode on the software's page. Then use a USB cable to connect your Broken/Locked iPhone to the computer, and wait for the software to detect your iPhone.
Step 3: After the software detects your device, you need to click "Start Scan" to scan the data in the iPhone.
Step 4: After scanning, the data on your iPhone will be displayed on the page. Select the data you need to recover, and then click "Scan" to extract specific data from the device.

Step 5: After extracting the data, you can preview and select specific data items on the page. Select the data you need to recover, and then click "Recover" to recover the data to your computer.
Part 2 Extract Files from iTunes Backup for Broken/Locked iPhone
If you have ever backed up your iPhone files to iTunes, you can retrieve the needed files in Broken/Locked iPhone according to the following operations. To use this method, you need the help of iPhone Data Recovery.
Step 1: Run iPhone Data Recovery on the computer, and then select "Recover from iTunes Backup File" mode on the page.
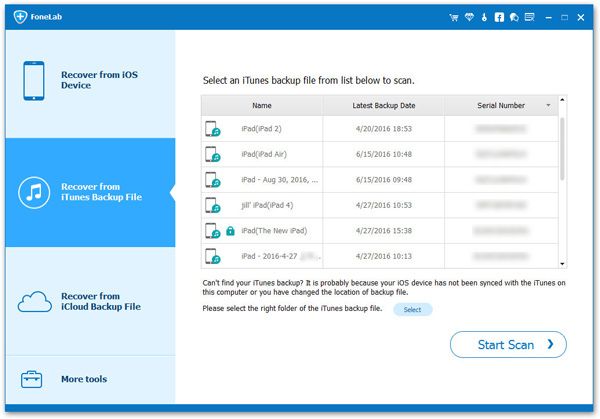
Step 2: Choose an iTunes backup files from the list on the page, and click "Start Scan" to start extracting data from the selected backup.
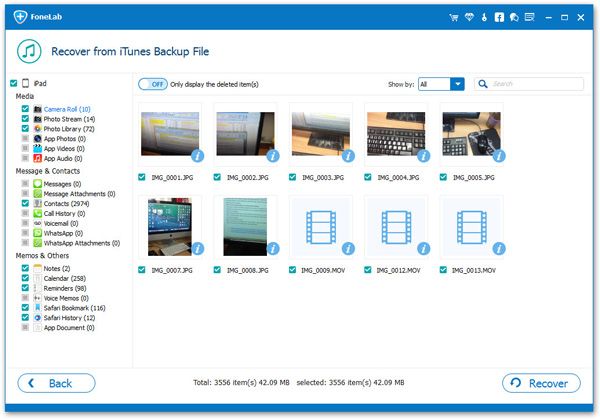
Step 3: Preview all the backup files on the page and select the data to be extracted. After selecting the data to be extracted, click the "Recover" button to restore the backup data to the computer.
Part 3 Extract Files from iCloud Backup for Broken/Locked iPhone
If you have ever synced your iPhone data to iCloud, you can also extract data from Broken/Locked iPhone. Similarly, you need the help of iPhone Data Recovery. It is worth mentioning that iPhone Data Recovery provides you with two options to help extract files in iCloud Backup.
Step 1: Run iPhone Data Recovery on the computer, and then select "Recover from iCloud Backup File" mode on the page.
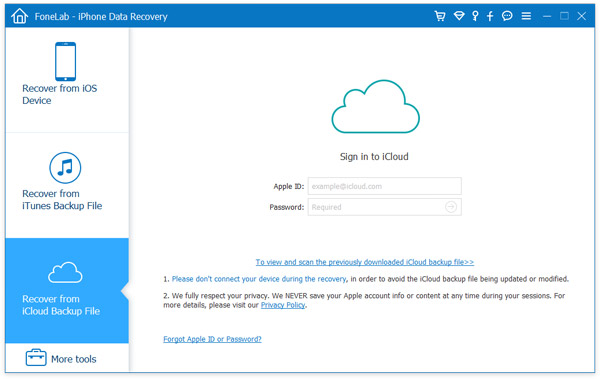
Step 2: Log in to your iCloud account on the page, and then use a USB cable to connect your Broken/Locked iPhone to the computer.
Option 1:
Step 1. Directly select the file data you need to extract on the page, such as Contacts, Notes, Reminders, Photos, etc.
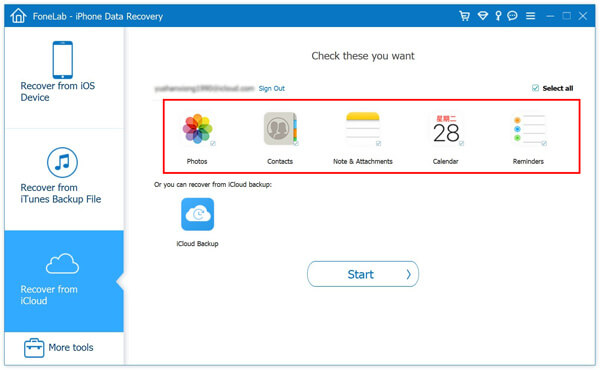
Step 2. After selecting, click "Start" to scan the selected file. After the scan is complete, just click the data type from the left column, and the detailed information will be displayed on the right.
Step 3. Select the data to be extracted on the page, and then click the "Recover" button to save the selected file on the computer.
Option 2:
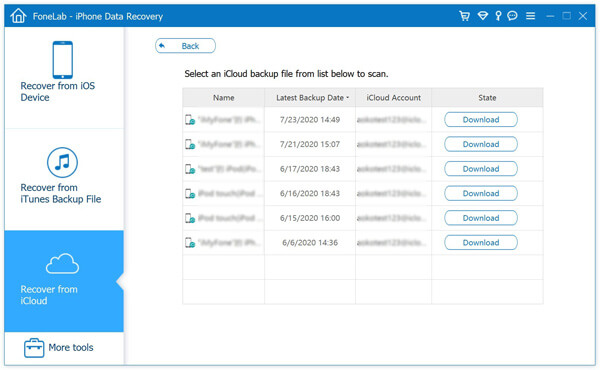
Step 1. Select "iCloud Backup" on the page, and then all the backup files in your iCloud account will be displayed on the page.
Step 2. Select the backup file you need, and then click "Download" to continue.
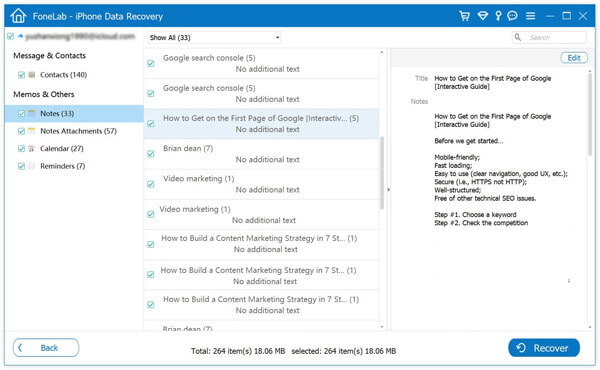
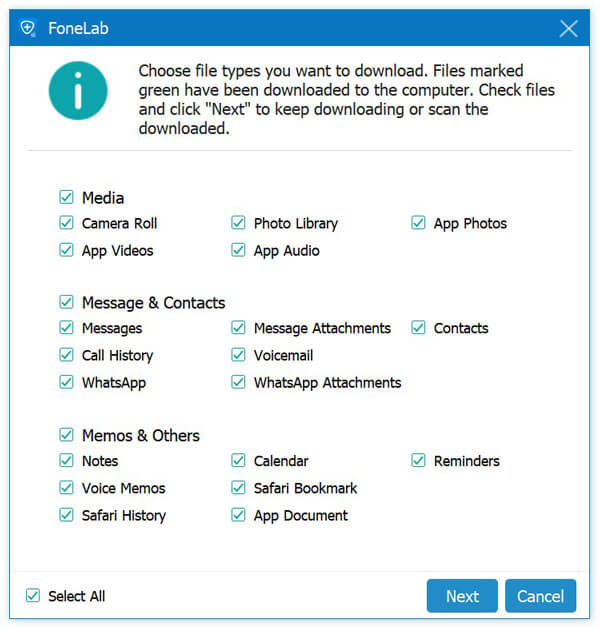
Step 3. In the pop-up window, all data types in iCloud backup will be displayed. Select the check box of the required data type, and then click "Next" to scan.
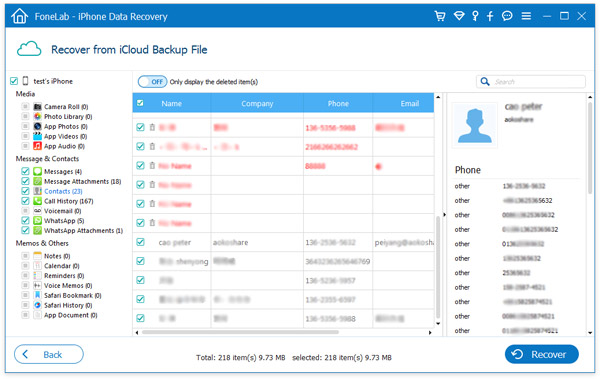
Step 4. After scanning, all extractable files will be displayed on the page. You can click on the data type in the left pane and view specific data items on the right. Select the files to be extracted, and then click "Recover" to export the selected data from the iCloud backup to your computer.
Part 4 Extract Files from Local Backup for Broken/Locked iPhone
As the all-in-one data management software, iPhone Data Recovery also allows you to backup and restore your phone data. So, you have ever backed up your iPhone data with this data recovery software, you can extract the data you need through the following steps.
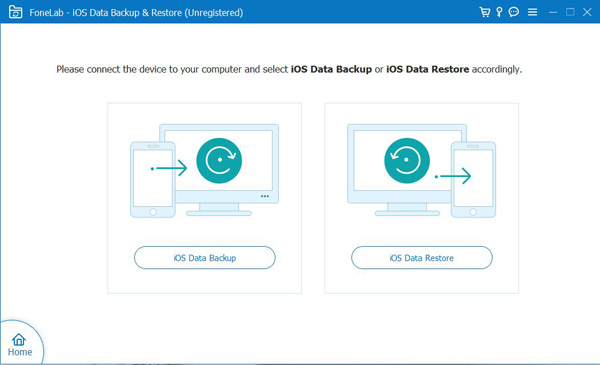
Step 1: Run iPhone Data Recovery on the computer, and then select the "iOS Data Backup & Restore" option and click on "iOS Data Restore" mode on the page.
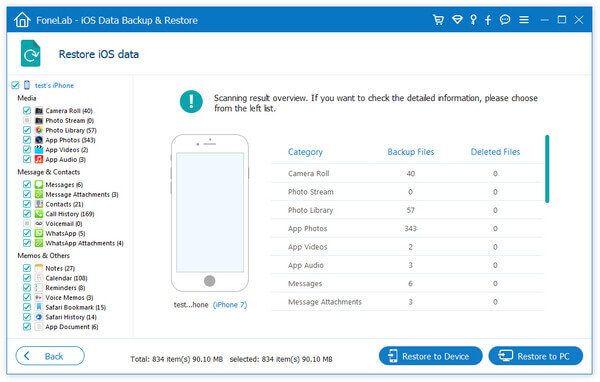
Step 2: Use a USB cable to connect your Broken/Locked iPhone to the computer. Then you can see a list of backups on the page. Select the backup file you need, and then click "View Now" to extract the data in the selected backup file.
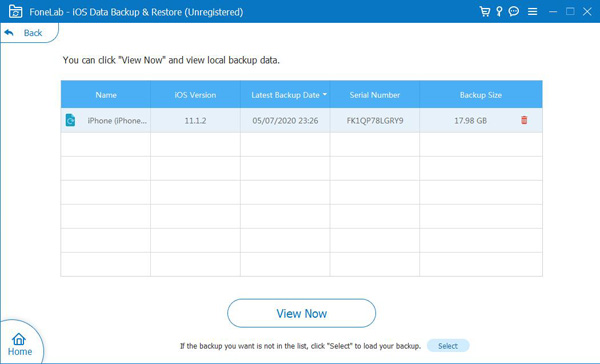
Step 3: On the left side of the page, you can view the detailed backup data. Select the data you need to extract to the computer, and then click the "Restore to PC" button to save the selected data to the computer. At the same time, you need to set the save path of the file, and then click "Restore" to confirm.
It is a good habit to back up files regularly. Because backing up data can always help you solve problems at critical moments. But if the iPhone screen is broken or locked, how to back up the data in Broken/Locked iPhone? Before you are going to repair your broken iPhone, or restoring the locked iPhone back to factory settings, I will introduce you three methods to help you back up the data in Broken/Locked iPhone.
Part 5 Backup Data from Broken/Locked iPhone with iTunes
This method will introduce you how to backup Broken/Locked iPhone data via iTunes. Choose this method, you may face two situations:
Your Broken/Locked iPhone has trusted your computer before
If your iPhone has trusted your computer before it is broken or the screen is locked, then the operation of backing up the data in your iPhone in iTunes is simple.
Step 1: Open iTunes on the computer, then connect your Broken/Locked iPhone to the computer with a USB cable, and wait for iTunes to recognize your iPhone.
Step 2: Click on the device icon on the top left of the screen, and then select "Summary" and choose "This computer" under "Automatically Back Up".
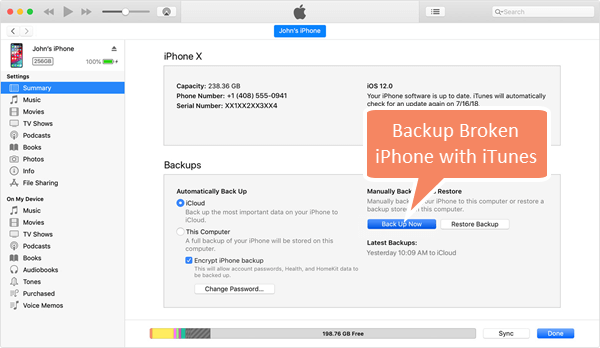
Tip: If you are backing up important files, you can check the box for “Encrypt local backup” to create a password to protect your backups.
Step 3: Click "Back Up Now" and iTunes will automatically save your backup to your computer.
Your Broken/Locked iPhone does not trust your computer.
If your Broken/Locked iPhone does not trust your computer, your iTunes will not be able to recognize your iPhone, which will cause trouble for your backup data. However, the trouble can be solved. Below I will introduce you how to solve this trouble.
Note: This method depends on the damage of your iPhone. If a small area of your iPhone screen is still working and you can enable voice-over mode, you can choose this method.
Step 1: On your Broken/Locked iPhone, hold Home key to turn on Siri and ask Siri to turn on VoiceOver. Swipe right/left until “Slide to Unlock” is selected, double-tap then the passcode page comes up. Swipe right/left to enter the passcode by double-tapping each number.

Note: If asked "Trust This Computer", double-tap the "Trust" button.
Step 2: Open iTunes on the computer, then connect your Broken/Locked iPhone to the computer with a USB cable, and wait for iTunes to recognize your iPhone.
Step 3: After iTunes successfully recognizes your iPhone, click on the device icon on the top left of the screen, and then select "Summary" and choose "This computer" under Automatically Back Up.
Step 4: Now, click "Back Up Now" and iTunes will automatically save your backup to your computer.
Part 6 Backup Data from Broken Screen iPhone with iCloud
If your Broken Screen iPhone does not trust any computer, you can also choose iCloud to back up the data in your Broken Screen iPhone. You need to prepare or a USB keyboard, a smooth WiFi network, and a lightning to USB adaptor.
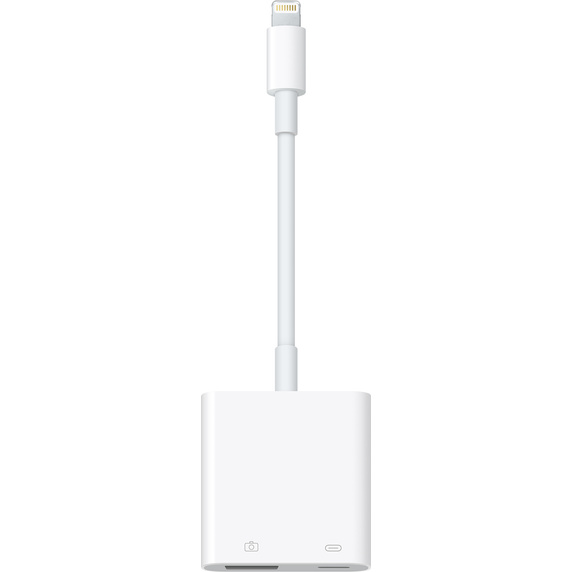
Step 1: Ask Siri to enable VoiceOver on your iPhone. Then connect the lightning to USB adaptor to the broken screen iPhone and plug the USB keyboard in.

Step 2: Ask Siri to open iCloud settings. Then ensure the "Apple ID" section is selected. Otherwise, move down the list of Settings to choose it by hitting the Right cursor key on the keyboard.
Step 3: Press the cursor key 22 times to get to iCloud Backup. Tap the iCloud Backup item by pressing Ctrl-Alt-Space on the keyboard. Now, on your iPhone with the broken screen, iCloud Backup should be enabled.
Tip: Each entry would be read aloud when you navigate.
Step 4: Connect your iPhone to a WiFi network. And press the right cursor key twice, followed by "Ctrl-Alt-Space" to help you click "Back Up Now" to backup the data from the broken screen iPhone to iCloud.
Part 7 Backup Data from Broken/Locked iPhone with iOS Data Backup
iPhone Data Recovery can not only help you recover the data from Broken/Locked iPhone, but also back up the data from Broken/Locked iPhone to your computer. So now, with the help of iPhone Data Recovery, I will show you how to back up the data in Broken/Locked iPhone.
Step 1: Run iPhone Data Recovery on the computer, and then select the "iOS Data Backup & Restore" option and click on "iOS Data Backup" mode on the page.
Step 2: Use a USB cable to connect your Broken/Locked iPhone to the computer. Then select your backup mode on the page, either "Standard backup" or "Encrypted backup", and tap on "Start" button.
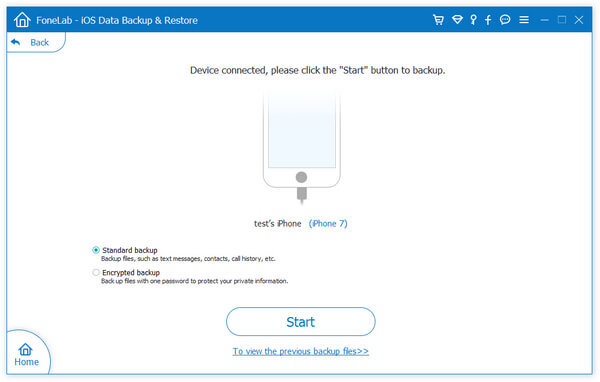
Notes: If you choose "Standard backup", you can directly select the type of data to be backed up on the page, such as contacts, messages, call history, photos, notes, App data, Safari bookmarks & history, Calendar, Reminder and so on. If you choose "Encrypted backup", you need to set an encrypted password to protect the backup. Then select the type of data to be backed up on the page.
Step 3: After selecting the backup data, click "Next" to continue setting the path where your backup file is saved and start backing up the data.
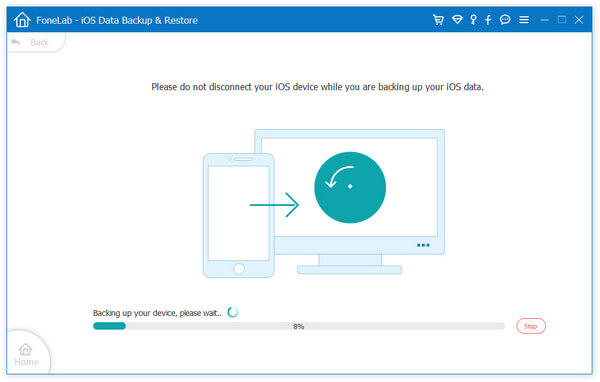
Tip: After the data is backed up, click the "OK" button, and you can view the data you backed up in the backup list.
Part 8 Fix iOS System Issue for Your iPhone
If your iPhone system is abnormal due to disabled for unlocking failure, stucking in Apple logo/headphone mode/recovery mode, stucking in black/red/blue/white screen death, or your iPhone is frozen for unknown reasons. Don't say you want to restore or back up your iPhone data at this time, it seems difficult for you to even use your phone normally. Now I will introduce how to repair the iOS system. In this process, you want the help of iOS System Recovery.
iOS System Recovery is a software that can help you quickly fix disabled iOS devices. Whether you have iTunes or not, you can use this method to restore your disabled device. It is worth noting that this method is actually to restore your iPhone to factory settings. So you can choose this method according to the actual situation.
Step 1: Choose the appropriate iOS System Recovery version and download it to your computer. Follow the prompts to install and run it.
Step 2: Use USB to connect the iPhone you need to repair to the computer. Then select "iOS System Recovery" on the page. Then click "Start" button to begin to fix disabled iPhone.
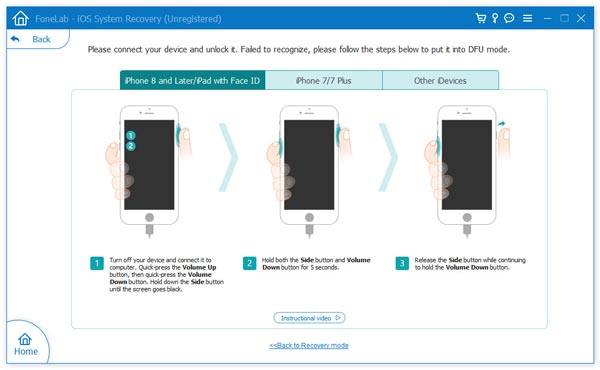
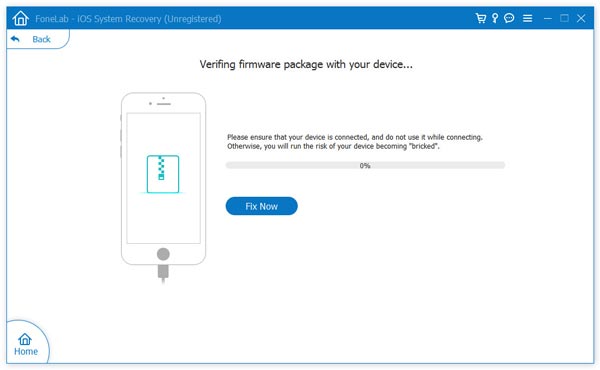
Step 3: Click "Question" button and follow the guide to turn your iPhone into DFU mode.
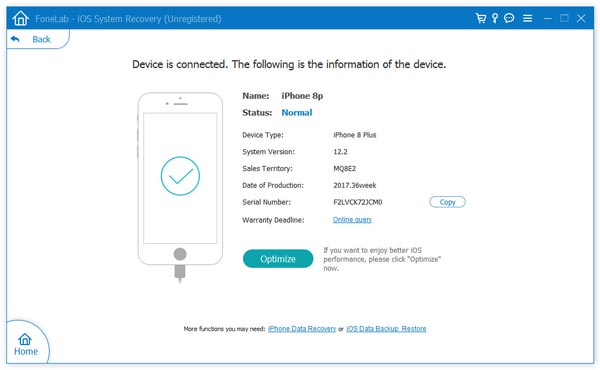
Step 4: Select the appropriate device model on the software page. Then click "Download" to get the required repair plug-in. After the download is complete, tap on "Fix Now", the software will help you complete the repair of the disabled device.